Editing Device File Busses
Sometimes your circuit design and XJTAG's device file library don't quite match up. It may be that there is more than one way to use a part, it may be that you have a slightly different part with a different footprint, or it may be that your pin numbering follows a different convention to XJTAG's numbering scheme.
This exercise shows you how to modify a test device file from the XJTAG XJEase library to reflect a difference in footprint between the library file and the circuit being tested. Many devices can be supported by making simple changes like this. Here we will re-categorise device D9 on the XJDemo v4 board to use a different file from the XJEase library, and then edit the bus definitions in the new file to match D9 in the XJDemo board design.
Because this exercise is based on the XJDemo v4 board, completing the XJDeveloper Tutorial before you work through this exercise will provide very useful background knowledge of this board and the structure of its XJTAG project.
This exercise starts with a project installed as a zip file: CompletedTutorial4.zip. The project is based on the one created in the main part of this tutorial.
- Extract the zip file CompletedTutorial4.zip to a directory of your choice.
- Navigate to the Board Test directory.
- Open XJDemo Board.xjd using XJDeveloper.
On the XJDemo v4 board, D9 is a 3-colour LED (containing a red LED and a green LED; the third colour is obtained when both LEDs are lit), and is tested using the 3-colour-LED.xje file. In this exercise we will change this to use an alternative file from XJTAG's XJEase library: multi-LED.xje. However, the pins in this alternative file do not match up with those of the device used on the XJDemo board, and so some adjustments are needed.
- Click the
 Categorise Devices screen button under the Setup header to edit the categorisation of a device.
 - Expand the Test Devices list.
- Select device D9.
- Click the Test tile in the Assign As section of the screen to re-categorise this device.
The new file we are going to use for D9, multi-LED.xje, is written for devices containing a number of separate LEDs in one package. Usually that would be more than 2 LEDs, but the file adjusts to the number of LEDs in the device, and so can be used to test this dual-LED device.
- In the Configure as Test dialog, click Browse library....
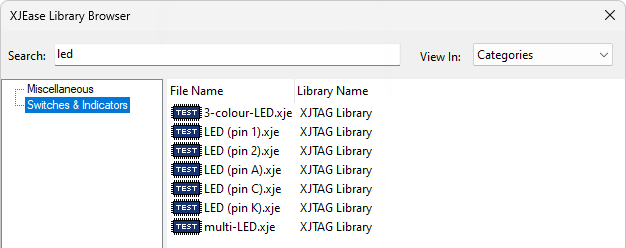
- In the XJEase Library Browser type LED in the Search box.
- Click on the Switches and Indicators category to show the category's files.
- Double-click on multi-LED.xje to select that file.
- Click OK in the Configure as Test dialog.
- Click the
 Save button to save the project.
The device D9 has now been categorised with the new file, but the mismatch in pin numbering can now be seen as warnings in XJDeveloper:
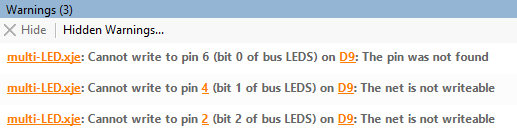
- Inspect the Warnings pane in XJDeveloper. There will be three new warnings shown, warning that pins 2 and 4 of device D9 are not writeable during tests, and that pin 6 is not found. This is because of the mismatch between the newly assigned file and the design of the XJDemo v4 board.
- Click the
 Run Tests screen button under the Run and Deploy header.
 - Deselect all tests from running by clicking
 Presets -> None at the bottom of the test list.
 - Click on the
 cross by D9.Test in the test list to enable the test.
 - Run the tests for the project. D9.Test will run, but observe that it fails with an error saying that it cannot test any LEDs in LED group D9.
Selecting profile 'All chains'...
ERROR: Cannot test any LEDs in LED Group D9
D9.Test failed (Error = 1) - ran in default profile (All chains)
>>>> FAILED <<<<
Depending on the nature of the mismatch between the device file and the circuit, tests may fail in a manner like this, or may display an error that they are unable to read from / write to a pin.
Having seen the problem caused by the mismatch of device file pins, the next thing to do is adjust the test device file to fix the problem:
- Click the
 Test Device Files screen button under the Setup header.
 - In the Navigator panel of the screen, double-click on multi-LED.xje to open the file for editing.
- Underneath the XJEase code displayed for multi-LED.xje is a list of Busses. When the LEDS bus is selected in the left panel, the right panel will show the access to the bus. In this case, verify that there is no access.
The LEDS bus on multi-LED.xje, by default, assumes that pins 2, 4 and 6 are the pins it can access. However, in this circuit, there are two pins it can access, and they are pins 1 and 3, so the LEDS bus needs to be edited.
This could be done by clicking the Edit Bus... button beneath the list of busses, but there is a quicker way:
- Double-click the Pins column of the LEDS bus in the Busses panel (on the text containing the bus pins 2, 4, 6). The text will become editable, and you can replace the existing list of pins with the pins that are accessible in this circuit: 1,3.
- Press the Return key on the keyboard to enter your change.
- Save the test device file by clicking the
 Save button at the top of the device file (not the one in the toolbar at the top of the project).
 - Select the LEDS bus in the list in the Busses panel again. The panel to the right of the busses will now show that XJTAG has Read/Write access to this bus on device D9.

The three warnings for D9 about inaccessible pins have now disappeared.
Busses in XJEase files are listed with the most-significant bit (MSB) listed first, and LSB last. This is not important for this LED test, but generally on devices with multi-pin busses (e.g. ADDRESS or DATA) you should set this up correctly, because generated fault reports will include this information.
- Return to the Run Tests screen and run the project's tests.
- The test should now run, and the LED on the XJDemo board should toggle red and green.
- A message box will be asking whether the LED is toggling its LEDs. Press Y on the keyboard and the test will report a pass.
This exercise has shown you how to use XJDeveloper to modify a test device file from the XJTAG XJEase library to reflect a difference in footprint between the library file and the circuit being tested. Many devices can be supported by making simple changes like this. When doing this for yourself it makes sense to spend a little time searching the library in order to find a device which is as similar as possible to the one you are trying to test - this may save you time overall.
XJTAG v4.3.0