Creating an XJPack File
To create an XJPack file in XJDeveloper, select File > Export Project > To XJPack File... from the menu bar or click the XJPack Project... button at the bottom of the  XJRunner Setup screen:
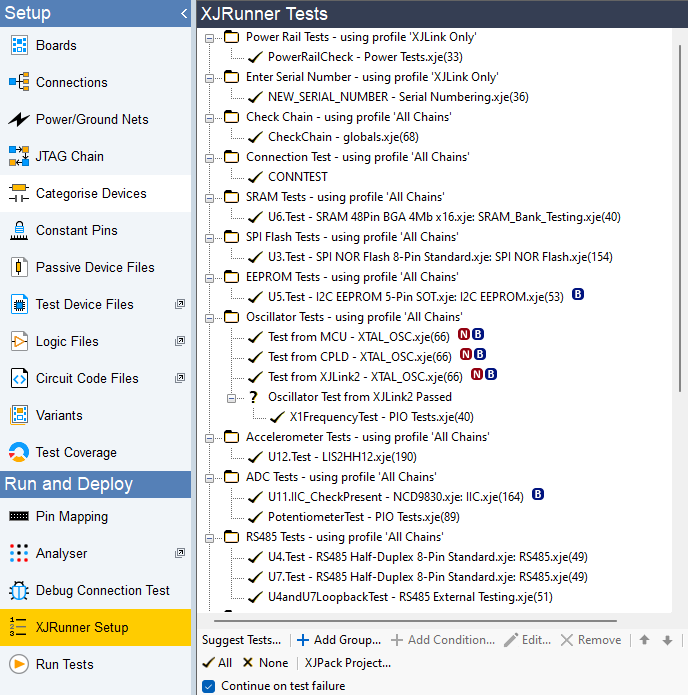
Figure 1: Creating an XJPack File from the XJRunner Setup Screen
This opens the XJPack dialog box illustrated by Figure 2 below. The BSDL files, data from the netlist, and all required XJEase files will be added automatically to allow the boundary scan tests to run. Optional data such as firmware images for programming, schematics, and layout information can be included in the dialog box:
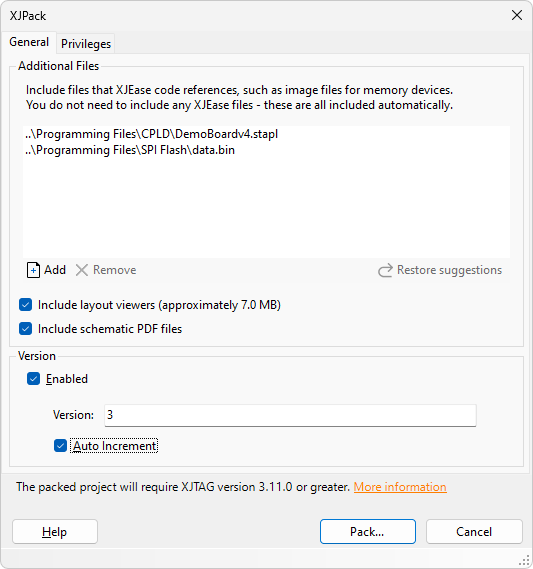
Figure 2: Options When Exporting an XJPack File
These options are described in the following sections.
Adding Additional Files to an XJPack File
To add files such as firmware images, click the  Add button to open a file browser and select the required files(s).
If additional files have previously been added to the XJPack file, they will be listed in the Additional Files box ready to be added again. If any of them are no longer wanted in the XJPack file, highlight the unwanted file(s) and click  Remove.
- You do not have to add programming files to the XJPack file, although doing so has the advantage that the images cannot be altered accidentally, and you will always know what was programmed when the XJPack file was run. However, every time you need to update the product firmware, you will have to create a new XJPack file. While the product being tested is in development and its firmware is changing regularly, you may therefore decide to wait until later in the product's lifecycle to include the image.
- When a programming image is stored in the XJPack file, version numbering can be used as a way to track what image was programmed into a board. When version numbering is enabled, the .xjlog results file stores the version number of the XJPack file used for the test. It can be viewed using the XJTAG Log File Viewer (XJTAG versions 3.11.0 and later).
- If the project includes programming operations but the files to be loaded are not contained in the XJPack file, it is important to check the files' locations and how their paths are defined. If absolute paths have been used, the location of the programming files must be maintained. Using relative paths makes file sharing easier because the PC on which the XJPack file is opened does not need an identical file structure to the originating machine. When using relative paths, the required files need to be located relative to the location of the XJPack file. The help system contains more details of how files are located.
Adding Schematics and Layout Data to an XJPack File
If you want to provide the production team with schematics and layout information to aid debug, this data can be added by ticking the relevant boxes in the XJPack dialog box:
Figure 3: Adding Schematic and Layout Information
- You may wish to consider creating two XJPack files – one with layout and schematic information and one without. This allows a production team to provide test operators with the basic file and only give the augmented file to repair technicians.
Adding schematic and layout information impacts the file size and project load time: projects typically load in under a second but adding this additional data can increase the load time to several seconds. If either of these are a problem to you, then only include this information if it is specifically required by the file's user (e.g. if they might need it to debug board failures). To help gauge the impact of including layout data, its approximate size is displayed alongside the checkbox.
Version Numbering in XJPack Files
To provide a record of which version of XJPack file was used to test a board, version numbering can be enabled. The version number will then be recorded in the *.xjlog results file and is displayed alongside the filename in XJRunner's title bar.
This feature is enabled in XJDeveloper by ticking the checkbox as shown in Figure 4 below:
Figure 4: Enabling Version Numbering in an XJPack File
When an XJPack file is created for the project, you can provide a string to be used for the version number. This is entered in the Version box as shown above. It can be any string and does not have to be numeric.
To set XJDeveloper so that it calculates the new version number that will required for subsequent files, tick the Auto Increment checkbox. When the XJPack is created next, the suggested new number will be shown in the Version box and can be edited.
Only the final numerical part of the string is automatically incremented: for example, version 2 will become version 3, whereas 2.19 will become 2.20, and 2.9b will become 2.10b.
- The version number is stored inside the XJPack file; it does not change the filename. Therefore, if you want to keep previous versions, you will need to alter the filename when saving to avoid overwriting the file. XJTAG recommends appending the version number to the name.
XJTAG Target Version for XJPack Files
A preferred XJTAG target version may be set for XJPack files. If enabled, then opening the file in any XJTAG application will generate a warning if the set target version does not match the current application version. This can be useful when you are running multiple projects built and tested against multiple versions of XJTAG, and you want to ensure the XJPack file is run under the version it was built against. Or you may be in a situation where a change in behaviour in a subsequent XJTAG release changes the behaviour of your project, and you wish to restrict the project to a specific version of XJTAG.
This feature is enabled in XJDeveloper by ticking the Set preferred XJTAG target version checkbox as shown in Figure 5 below:
Figure 5: Setting the XJTAG target version.
If the Enforce preferred target in XJIntegration checkbox is checked then the XJPack file will prevented from opening through XJIntegration unless the target versions matches the current XJTAG version.
- XJTAG version 4.2.0 or later will be required to open the XJPack file with this feature enabled. Therefore the minimum supported target version for this feature is 4.2.0.
Saving the XJPack File
Once the paths to any additional files have been added and you have set the options for adding schematics and layout data, and configured any version numbering requirements, the XJPack file can be created by clicking the Pack... button at the bottom of the XJPack dialog box.
Once the file is created, contents such as image files for programming, layout, schematic, and the XJEase code for each test cannot be changed. This has the advantage that any programming files included in the XJPack file cannot accidentally be altered: you are guaranteed that only those images will be used.
XJDeveloper can be configured so that any subsequent updates to the originating project in XJDeveloper will cause you to be prompted to create a new XJPack file when closing the project.
- This prompt can be enabled or disabled in XJDeveloper's settings: go to Tools > Options... from the menu bar. In the Prompts area of the Interface section, scroll down to the Projects group and use the Prompt to update XJPack file when closing the project checkbox. The prompt can also be disabled by ticking the Do not show this message again box when it is displayed.
XJTAG v4.3.0