Enabling and Disabling Tests
The Test List on the right of the main screen shows the list of tests for the current project. Each test has an icon to the left of its name which allows you to see whether it will be performed when you click the  Run button in the main part of the screen.
When the Run Tests screen is first shown, the default tests are selected.
You can change which tests are run and how many times they are run. Changes made on this screen will not be saved, so next time the project is loaded the project defaults will be restored. If you wish to make the change permanent then it needs to be made either in the XJRunner Setup screen of XJDeveloper, or in the Project Management settings in XJRunner.
Controls on whether a test runs can be applied to an individual test or a group of tests, by:
- right-clicking on the test or test group, or
- selecting the test or group, and clicking Selected Test at the bottom of the panel.
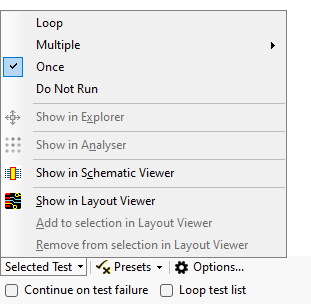
In either case there are four options related to running tests:
- Loop
- Run this test continuously (shown as
 or
or  )
) - Multiple
- You will also need to enter the number of times to run the test (shown as
 or
or  and the number of loops is shown after the test name)
 - Once
- The normal mode of operation where the test is run once (shown as
 or
or  )
) - Do not run
- Disable the test from running (shown as
 or
or  )
)
Shortcuts to enable/disable tests
- Single-click on the icon next to the function or group
- This toggles the test between disabled and enabled to run once.
- Double-click on a test's name
- This also toggles the test between disabled and enabled to run once.
Returning to the default set of enabled tests
If the default tests are modified in the main Project Management section, the enhanced testing panel will remember your previous selections for as long as the project is open. You can reset the test list to the default tests for the project by clicking the Presets dropdown menu at the bottom of the panel and choosing Default.
Conditions in the test list
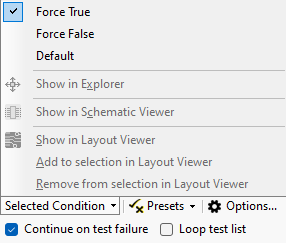
If conditions ( )are present in the testlist, then they can prevent tests from being run in isolation, particularly if the condition refers to the result of a another test. Conditions can therefore be overridden and forced to always evaluate as TRUE or FALSE.
Overriding conditions
To override a condition:
- Select the condition in the test list
- The Selected Condition button will appear in the menu at the bottom, from where you can select what value the condition should evaluate to.
- Or right-click the condition
- A pop-up menu will appear with the same three options.
- Or single-click on the icon next to the condition
- This cycles through the three possibilities.
- Or double-click the name of the condition
- This cycles through the three possibilities.
If forced to True then the icon will appear with a tick next to it  and if forced to False a cross will appear
  .
.
XJTAG v4.3.0