User Management
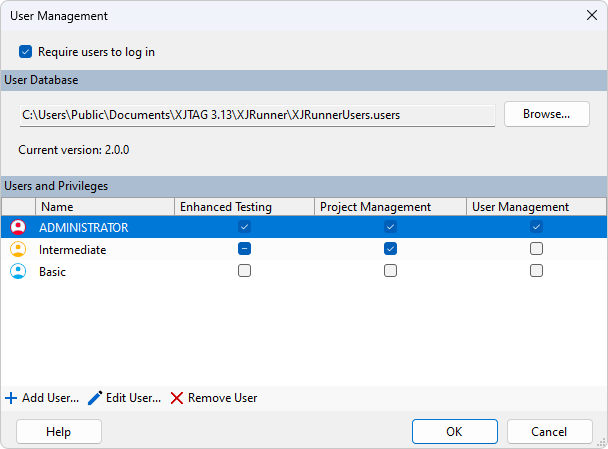
The User Management dialog is used to manage users and their privileges in XJRunner. By default, in a new installation of XJTAG, user logins are disabled, but if you require users to login then this dialog is only accessible to users with user management privileges.
The dialog can be reached:
- by clicking on the
 User Management button on the toolbar
 - by selecting User Management... from the Tools menu
- from the
 Manage Users button on the welcome screen. This screen is shown when no project is open, but after the user has logged in (if user logins are enabled).
 - by pressing F7 on the keyboard
Enabling User Logins
The Require users to log in checkbox controls whether users need to provide a username and password before opening a project and using the application.
By default, in new installations, this option is disabled, meaning all users can use all parts of the application.
When enabling user logins, you will be prompted to change the existing administrator password, or create a new administrator user. This helps to prevent becoming locked out of XJRunner if old passwords have been forgotten.
If you are upgrading an older version of XJTAG, the existing XJRunner database will be used. This means that if logins were previously enabled they will still be enabled, and existing user login/password combinations will continue to work.
Managing Users
The lower part of the screen displays the current list of users, with an overview of their current privileges. Beneath the list of users are buttons to allow the users to be edited:
 Add User... - allows further users to be added
 Edit User... - edit the currently selected user's password and privileges
 Remove User - delete the currently selected user
Default Password
When you install XJTAG, there is a default user already created in the user database, with full privileges. It is strongly recommended that the password for this user is changed at the earliest opportunity if user logins are to be enabled.
Username: administrator
Password: administrator
User Database
The User Management dialog allows selection of a different user database, for example if you use a common database for all users across a network. In the User Database section of the dialog, click Browse... to locate the new database file. The new database must contain the current user and you will be required to log in again after completing the switch.
From XJTAG 3.12 onwards a new format (version 2.0.0) is employed for the users database; this is incompatible with previous XJTAG versions. This is to enable setting advanced user privilege options.
N.B. If you are currently using a v1.0.0 database, you can continue to use this database as before until prompted to migrate your user data to the new v2.0.0 database. After migrating, any changes made to one database will not be applied to the other.
Adding a New User
In the User Management dialog,
click Add User... to create a new
user. The Add New User dialog will be displayed.
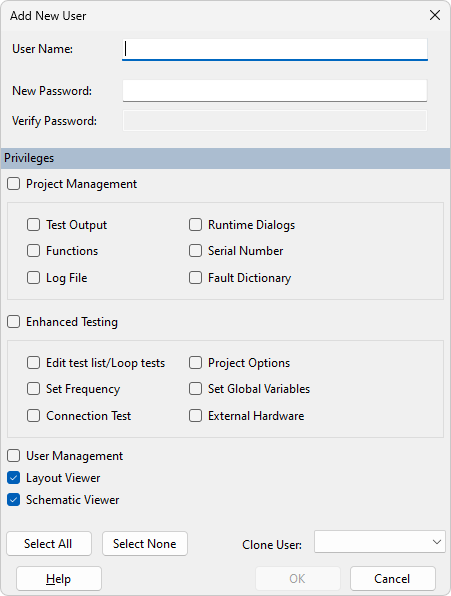
Enter the Username, then enter the user's password into both Password boxes. Underneath this, choose the privileges this new user should have. Then click OK. The new user will then appear in the list of users on the main User Management screen.
Deleting an Existing User
In the list of users, select the user to be deleted.
Then click Remove User to delete the
user.
N.B. Users cannot delete themselves. At least one user must have User Management privileges.
Editing a User
To change a user's password or privileges, select the user and click Edit User....
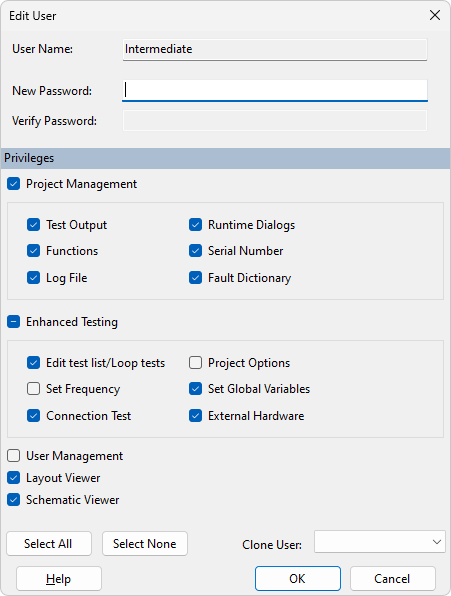
The user's current privileges will be displayed in the Edit User dialog and can now be altered. To change the password, enter the new password in both Password boxes. When you are happy with your changes, click OK.
XJTAG v4.3.0