The Structure of a Test Device File
Device files contain two parts:
- Preamble: declares information on the device’s pins or groups of pins that you want to interact with, a list of any additional code files that will be called, and additional information related to using the device.
- Code section: includes the XJEase code that interacts with those pins, using names declared in the preamble.
The contents of these sections are described in the rest of this guide.
When viewing or editing the file, only the code section is shown in the upper pane (see Figure 4 below); data taken from the preamble is displayed in the section beneath the code.
The preamble holds information on the device, including the following:
- Declaration of the pins or groups of pins to be interacted with (listed in the Busses tab). This is where the device’s physical pin numbers are mapped to bus names so that the XJEase code can refer to pins / groups of pins by name, which simplifies coding and aids reuse. Using names in this way also means that similarly functioning devices with alternative footprints or different width busses can share the same test device file.
- Disable values (listed in the Busses tab). They define the value of a pin or group of pins that will put the device into its inactive state.
- A list of used additional code files (i.e. a list of separate files holding XJEase code that will be called from this device file). These appear in the Additional Code Files tab. More information on this type of file can be found in the section on Running Code That Resides in Other Files.
- Configuration data, which is used to provide values for any implementation-specific constants used in the XJEase code. These constants are set in the Configuration Data tab, and more information on using them can be found in the section on Allowing Constants to be Different in Alternative Circuit Configurations. They are useful when a constant needs to be different depending on how a device is configured at the hardware level (e.g. pins that set its address).
- Test Coverage Information, which can be found in the Busses tab. This tells XJDeveloper what test coverage will be achieved by running the device file’s test function(s).
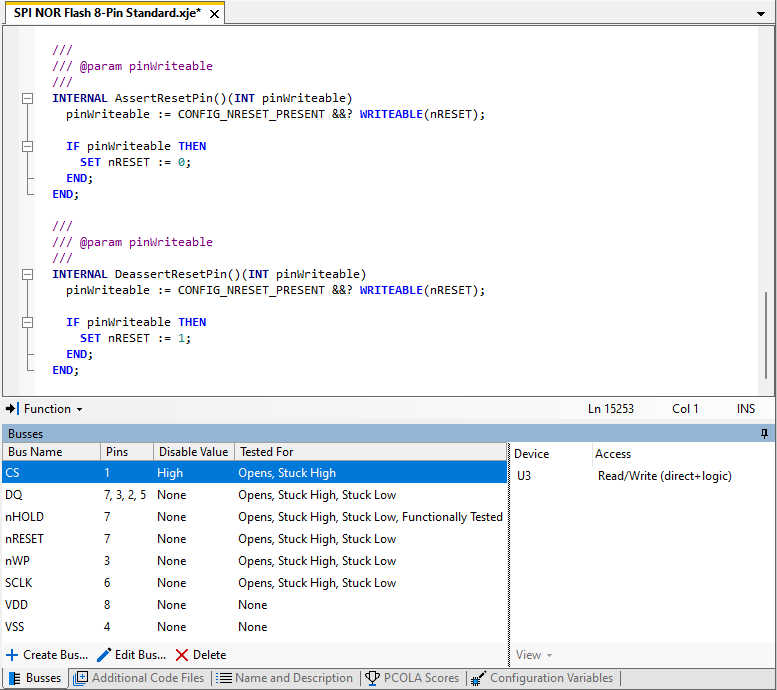
Figure 4: The Test Device File Editor
The code section (upper pane in Figure 4 above) holds the XJEase code that will interact with the device using the information provided in the preamble. To simplify coding and to support reuse, references are made to the bus names rather than the pin numbers.
More details on coding with XJEase is provided in the section below on The Basic Syntax of a Test Device File.
Declaring a Device’s Pins
All the pins that a boundary scan test might want to interact with need to be listed in the Busses pane. For completeness, other pins might be included such as power or those that are not connected in the package, but it’s not mandatory for them to be added.
The different columns are as follows:
- Bus Name: a name that the test code can use to refer to this pin or group of pins. It must be unique within the file.
-
Disable Value: if the device will need to be placed into an inactive state at any point to prevent it from interfering with a test, the value for the pin or group of pins that will put it into that state are set here. These "disable values" form part of the "safe bitstream", which is applied as part of the JTAG chain initialisation (which is executed before the interconnect test is run and whenever the JTAG chain is reset).
When a bus contains multiple pins, it is only possible to set all the pins in that group to the same Disable Value.
- Tested For: the type of assembly fault that will be checked by this test.
More information about the Busses pane is provided in the section on Adding Pin Information.
- To make the file as reusable as possible, it is good practice to include all the pins that a boundary scan test may want to interact with, not just the ones that are being used in that particular circuit.
The Basic Syntax of a Test Device File’s Code Section
Figure 5 shows a simple function. The test device file has a single-pin bus with a name of ON_OFF that this function controls:
/// Sets bus 'ON_OFF' to the value of the variable 'state'.
/// This function has global scope so can be called from a
/// Circuit Code File to allow automated testing of LEDs.
///
/// @param state Value to apply to the ON_OFF bus
///
GLOBAL SetLED(INT state)()
  IF state < 2 THEN
    SET ON_OFF := state;
  ELSE
    SET ON_OFF := I;
  END;
END;
Figure 5: Example of a Simple Function
The optional initial block of text (known as Function Docs) is identified by "///" and has two sections: the first describes the behaviour of the function. This is the description that will be used in the Test Summary Report (generated from the Test Coverage screen) when it lists the available tests. That is optionally followed by one or more rows that define the input arguments and return parameters (starting with the @param tag and followed by a brief description of their use). In this example, there is just one input argument, but when a function has multiple input arguments and/or output parameters, each would be defined on a new line with its own @param tag.
The XJEase code starts with the function declaration "GLOBAL SetLED(INT state)()" and finishes with the END keyword.
The function declaration has two sets of parentheses. All parameters in the first set of parentheses are input arguments, and those in the second set of parentheses are return parameters. In this example, nothing is returned by the function so the second set of parentheses is empty.
In the function, SET and I (6) are standard XJEase keywords. SET is the main mechanism for accessing pins on the board being tested and operates on the pin or group of pins referenced by their Bus name; it can apply values to the pins and read from them. In the example above, the value passed in to the function is expected to be '1' or '0', which will set the single-bus pin high or low. Setting a pin to I (when supported by that particular pin), turns off the output stage and therefore puts it into its tri-state high-impedance condition.
- Although the second group of arguments in the function declaration are notionally outputs, they are actually variables that are passed by reference. In some circumstances, they can also be used as input parameters.
- The XJEase language is case sensitive: the variable result is different to Result.
- For a more detailed reference on using XJEase, and a list of keywords, refer to the XJTAG Help Files.
The above example shows the use of the @param tag. There are also other tags that can be used in Function Doc entries, and they are listed in the XJTAG Help Files entry on XJEase Function Docs.
Scope of a Function
A function can be declared with one of three possible scopes. It is good practice to limit the scope as much as possible to reduce the chance of bugs caused by mistakenly calling the wrong function. It also means you do not need to worry about functions that may have the same name in other code files.
The scopes are described below.
- GLOBAL: functions should be made global when they need to be called from another file in the project (e.g. from a circuit code file). For a test function to appear in the project’s test list, it must be declared as GLOBAL.
- INTERNAL: used when a function does not need to be called from a circuit code file but will be called from anywhere within this device file or from its additional code files. For example, Math.xje includes functions that perform mathematical calculations that are used by memtestSRAM.xje during memory testing. Because both files are additional code files to the SRAM test device file, the functions that perform the mathematics should be declared as INTERNAL.
- LOCAL: local functions can only be called by other functions in the same file. This scope is applicable to a function that is only used by test code in that particular device file (for example, if a test function calls several smaller tests and returns an overall result, the functions it calls are only used within that device file and so it is best to declare them as LOCAL). This does mean that if a test device file has several associated additional code files, it is possible for each of those files to define a LOCAL function with the same name, although it is probably undesirable to do so.
If a scope is not declared, the function will be given global scope.
- Multiple device files can use the same name for functions, even though those functions are declared as GLOBAL. For example, most of XJTAG’s library device files contain a function called Test. This is not a problem because, when the test list calls a function, the device it’s acting upon is also specified, and the system knows from that device’s categorisation which test device file is applicable. For example, the test list entry IC7.Test refers to a function called Test on IC7, and the system knows which test device file was used to categorise IC7 and, hence, where to find that function. Identical function names can therefore be used in multiple test device files.
- This also means that, when a circuit code uses CALL to call a function from a test device file, the name of the device the function will act upon must be included. For example, to run a test called Test on device IC7 on the board Demo, the expression would be:
- CALL("Demo.IC7", "Test") () (result);
- Test functions within the same test device file must have different names. XJEase files are syntax checked when they are saved, and any duplicate function names will cause an error to be reported.
Variables
The XJEase language has three main variable types:
- INT: XJEase’s support for numbers is limited to unsigned integers. There is no upper limit on their width and it is not mandatory to define a width because integers automatically expand. Floating point (decimal) numbers are not permitted.
- STRING: text strings of any length are supported.
- FILE: used for files.
XJEase also supports array versions of all the above.
- XJEase only supports integral numbers. Therefore, if your data would normally require the use of decimals, it is advisable to change the units to avoid losing resolution. For example, 3.054 V is better handled as 3054 mV, and 0.123 mV is better expressed as 123 µV. NB: there is a set of Format commands in Math.xje that can be used to express these numbers using decimals for printed results.
- Although it is not mandatory to define the width of an integer, there are situations when doing so can be advantageous - for example, if you have an operation that needs a variable of a certain width to function correctly. Note, however, that its width is only checked when the value is set during declaration and will automatically grow if necessary later.
Flow Control
XJEase provides the following common flow control methods (refer to the XJTAG Help files for a more comprehensive list and further details):
FOR loop:
In the FOR loop, all the statements are executed in each pass round the loop.
// Execute the function 'Func' ten times
FOR i := 0 TO 9
  Func(i)();
END;
DO/WHILE loop:
The syntax of a DO/WHILE loop is illustrated by this example:
DO
  Func(a)();
WHILE a != 10
  a := a + 1;
END;
This evaluates the WHILE expression in the middle of the loop, but alternative constructions allow it to be evaluated at different points.
DO WHILE a!=10 ...; END; evaluates the condition at the start and is equivalent to the while(a!=10) {...} loop that almost all languages support. The DO ...; WHILE a!=10 END; construction evaluates it at the end and is equivalent to the do {...} while(condition) loop found in many popular languages.
The BREAK statement:
All loops can be terminated early using the BREAK statement. Execution then continues from the statement immediately after the loop's END keyword.
DO
  b := Func();
  IF b != 0 THEN BREAK; END;
  key := GETKEY();
WHILE key != ' '
END;
In this example, the loop terminates when the function returns a non-zero value or the space bar is pressed.
IF statement:
In the IF statement, the first block of code is executed when the IF statement evaluates as TRUE, and program execution then resumes after the END keyword. Otherwise, any ELSIF clauses are evaluated: if none of those evaluates as TRUE, the concluding ELSE statement will be executed.
IF a < b THEN
  PRINT("a is less than b\n");
ELSIF a > b THEN
  PRINT("a is greater than b\n");
ELSE
  PRINT("a equals b\n");
END;
SWITCH statements:
The SWITCH statement allows the program flow to be controlled by matching an input parameter to a collection of values, and works with integer and string inputs. One DEFAULT clause can also be included containing statements to be executed if none of the CASE statements match.
SWITCH str
  CASE "y", "Y", "Yes", "yes"
    result := TRUE;
  END;
  CASE "n", "N", "No", "no"
    result := FALSE;
  END;
  DEFAULT
    PRINT("Unexpected value in string");
  END;
END;
- Pressing the F1 key with a keyword selected in your code will bring up help for that keyword.
Making Test Functions Appear Automatically in the Project’s Test List
The following criteria must be met for a test function to appear in the project’s test list:
- It must have global scope
- It must have a single return parameter that is an integer
- Its code must be error-free
Provided these criteria are met, it is possible for the test function to be inserted automatically into the test list when the device is categorised. For this to happen, the relevant code must already be in the test device file, the Add Tests box must be ticked in the Assign Device as Test dialog, and the Auto Test List feature must not have been disabled (see Adding Tests from a Newly Created Device File to a Test Group).
Test functions are normally written so that they return RESULT_PASS or RESULT_FAIL (global integer constants that are defined in the globals.xje circuit code file that resides in the project folder). RESULT_PASS has a value of zero, and RESULT_FAIL has a value of one.
- It is possible to write a test function so that it returns an error code: although test functions are only permitted a single integer return parameter, values other than RESULT_PASS or RESULT_FAIL can be used, provided that a pass is indicated by zero. Any integer greater than zero will be taken to indicate a test failure and can therefore be used to provide an error code.
XJTAG v4.3.0