Identifying the Power/Ground Nets
There are three reasons why XJDeveloper needs to know which nets are power and ground:
- XJTAG must not try to drive those nets.
- Any connections from JTAG-enabled input pins to those nets will be checked during the Connection Test.
- XJDeveloper can suggest which resistors are pull-up and pull-down resistors and then test those pull resistors automatically during the Connection Test.
On the XJDemo board, there are several power nets and one ground net. Most boards, including the XJDemo board, have power nets that are extended through links such as ferrite beads or inductors to form a more complex set of nets supplying power. Often these are named in a helpful manner so that you will recognise them as also being power nets, but sometimes not.
N.B. XJDeveloper suggests nets to be power or ground based on their names, so you should always check the functionality of a net before making assignments.
Here we will start by making the obvious assignments, which we can be most confident are correct – the GND net and the +1V8 and +3V3 nets, which it is very clear how to assign.
There are other nets suggested as power nets by XJDeveloper, which we will deal with shortly.
- Click
 Power/Ground Nets under Setup.
 - Click the + next to Suggested Ground Nets in the Net Selector to expand it.
- Click GND in the list and drag it into the Ground Nets list.
- Click the + next to Suggested Power Nets in the Net Selector.
- Hold down Ctrl and click each of the nets +1V8 and +3V3 to select them.
- At the bottom of the Net Selector section, click Assign As and select Power Net. This will assign the selected nets to the Power Nets list.
Often, the main power nets have other nets linked to them via low value resistors, inductors or ferrite beads. On the XJDemo v4 board, the net +3V3_CPLD_IO is an example of this. Having categorised the obvious power nets you can use the  Links... buttons underneath the lists of power or ground nets to find such devices and implicitly categorise the connecting nets as power or ground. The number within the brackets on the Links... button indicates how many potential linking components have been found on the nets already categorised.
- At the bottom of the Power Nets list click Links (5)....
- Assign will already be selected for all 5 of the suggested ferrite beads, as shown in the image below, so just click OK.
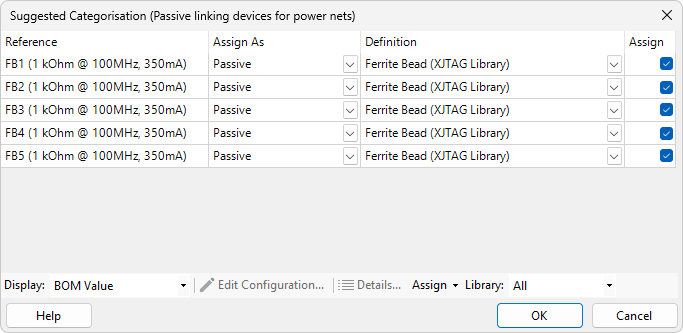
N.B. Using the Links... functionality allows the system to find power and ground nets that might not otherwise be automatically suggested, such as NetC16_2 on the XJDemo board.
The extensions to the main power nets are now shown in the Power Nets column of the screen, grouped under the main power nets. It is always worth checking that the names of all nets within each group match – for example, in the +3V3 group, all the subnets also have 3V3 in their names. If one had a different voltage in the name this would indicate that something was wrong.
At this point, ADC_VREF remains in the suggested power nets. In order to verify that ADC_VREF is actually a power net you can use the Schematic Viewer.
- Right-click ADC_VREF and select
 Show in Schematic Viewer.
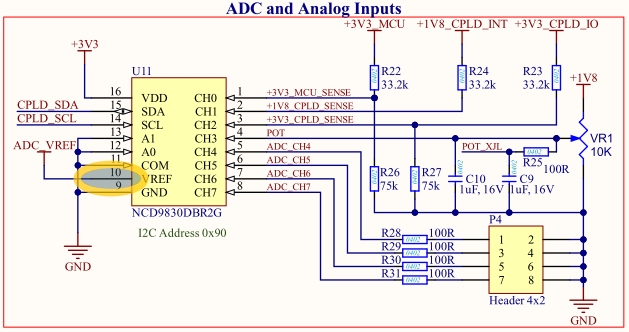
The schematic symbol at the end of the highlighted net shows ADC_VREF as power, and so this net should be categorised as a power net.
- Return to the XJDeveloper main window.
- Right-click ADC_VREF in the Net Selector, then choose Assign As and select Power.
N.B. XJDeveloper suggests nets to be power or ground based on a number of different criteria, including their name and the number of capacitors on them. You should examine a net's functionality carefully before making assignments, especially for lower scored nets. The rules for matching net names can be modified in the Options dialog.
It is important to check that XJDeveloper's suggestions are correct. If a net is incorrectly categorised as a power net, any JTAG-enabled pins would not be driven in Connection Test, but Connection Test would try (incorrectly) to check that they were always reading a value of High. If a power net is not categorised as such then XJTAG may try to drive the net against the power supply.
- Click
 Save on the main XJDeveloper toolbar.
N.B. There are no Termination Reference nets on the XJDemo board so this column of the Power/Ground Nets screen remains empty.
In the next step of this tutorial you will identify the JTAG devices in the circuit.
XJTAG v4.3.0