Finally...
By following this tutorial you have set up a project to test the XJDemo board. You provided XJDeveloper with netlist, layout, schematic and BOM data to allow it to represent the board and its connections, and then you gave it data about the JTAG devices on the board. With the JTAG chain defined, you provided information about non-JTAG devices and set up tests for those non-JTAG devices. You have created a number of different tests for the circuit and seen how XJTAG software runs those tests and how they react to faults on a PCB.
You have also seen that you can view the test coverage which your tests achieve at any point during the project setup, but there is still more that can be done to test the board. The test coverage tutorial exercise continues from this point and explains how to give XJDeveloper further details about how each device is tested - this means that the project will be more accurate when reporting how much of the board is actually tested.
Thank you for following this tutorial - we hope it helps as you begin to set up your own projects. There is much more information available by clicking the Help menu or by pressing the F1 key from within any XJTAG application.
Exporting the project to use in XJRunner
To enable this project to be used by XJRunner, you must create an XJPack file for this project. For more information on creating an XJPack file, see the help for the XJRunner Setup Screen. For more information on using an XJPack file to run tests in XJRunner, see the XJRunner Tutorial.
The Analyser screen
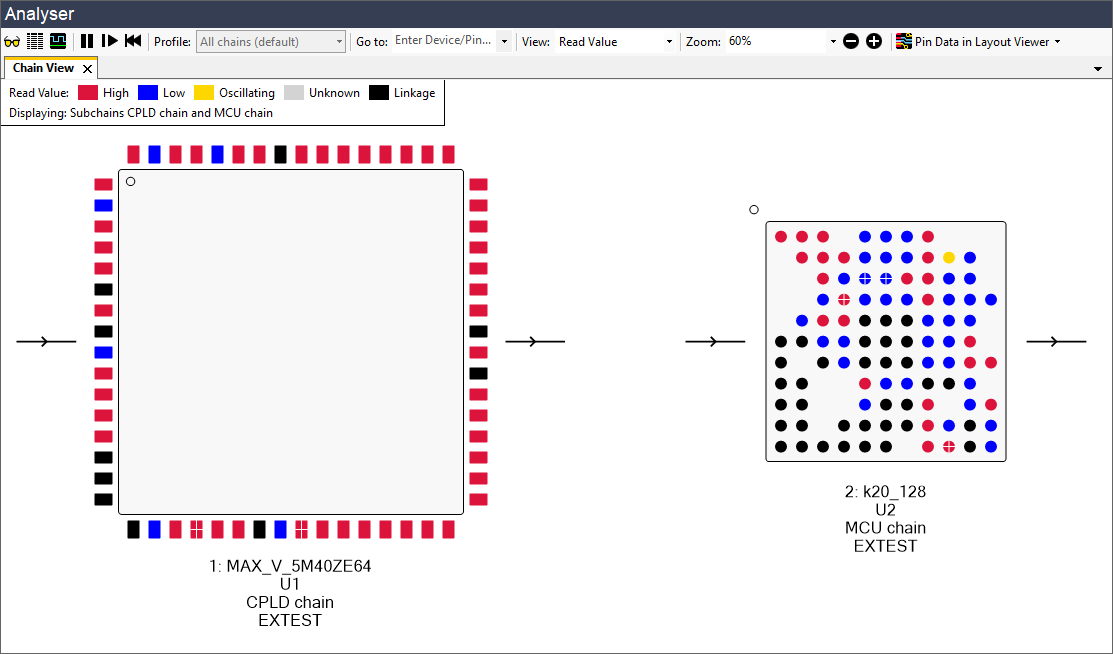
The Analyser screen contains all the functionality of XJAnalyser within XJDeveloper, allowing you to monitor and drive the pins on your JTAG devices directly. To access the Analyser screen, click the  Analyser screen button under the Run and Deploy header.
Once you are on the Analyser screen, additional tools can be found in the Analyser menu on the main toolbar. For further information about using the Analyser screen, see the XJAnalyser help files.
It is also possible to open a separate window containing the Analyser screen. You can do this by either clicking the  Pop-out screen button located on the Analyser screen button or click the
  Separate Screen button on the toolbar when on the Analyser screen. This allows you to use other parts of XJDeveloper whilst keeping the Analyser screen visible.
Further Exercises
This tutorial was designed to give you a firm foundation in the basic principles of generating an XJTAG project. The following exercises show other aspects of XJDeveloper:
More complicated JTAG setups
Some boards have multiple JTAG chains, or more steps that have to be done in order to make the JTAG chain run properly:
- Manually identifying the JTAG chain - how to manually set up a JTAG chain.
- Linking the two JTAG chains on XJDemo board v4 - how to configure two JTAG chains to only use one TAP on the XJLink.
Advanced project setup
These exercises go into more advanced aspects of setting up a project which are not covered by the main tutorial:
- Defining Logic devices - how to create and define a logic device.
- Configuring and using the Fault Dictionary - how to configure the Fault Dictionary.
XJEase programming
These topics are aimed at those who are beginning to write or modify XJEase tests:
- Editing Device File Busses - how to adjust a device file to match the required footprint.
- Using Circuit Code Files - how and when to use circuit code files.
- Using Enhanced Input/Output Functionality - how to use the XJEase functions MESSAGEBOX, INPUTBOX and PRINT_FORMAT.
- XJLink Programmable I/O - how to use the advanced I/O and measurement capabilities of the XJLink.
- Serial Numbering - how to manage board serial numbers with XJTAG.
Advanced XJEase programming
- XJEase Excercises - a set of exercises to get started programming in XJEase
Test coverage analysis
This additional tutorial explains how to use XJDeveloper to improve test coverage for your circuit:
- Test Coverage Tutorial - how to analyse and improve reported test coverage, including a worked example.
Project setup without a netlist
It is still possible to create an XJTAG project for your circuit even if you don't have a netlist, as this tutorial shows:
- Creating a board without a netlist - how to create a board without a netlist.
XJIO board tutorial exercise
If you purchased an XJTAG Professional system or have added an XJIO board to your system, there is a tutorial for how to set up tests with an XJIO board.
XJTAG v4.3.0