Add Connection Dialog
The Add Connection dialog is used to add a connection between two pins or two devices. The controls shown depend on whether a circuit connection or an XJLink connection is being added.
The Edit Connection dialog is laid out identically, but some of its controls will be disabled depending on which connection(s) were selected on the Connections Screen.
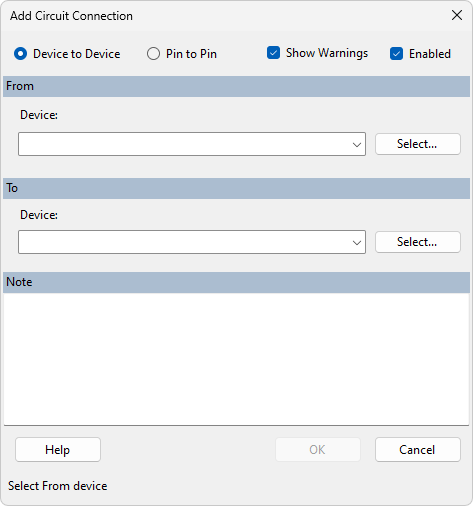
The type of connection to create is chosen by selecting either Device to Device or Pin to Pin. A pin-to-pin connection connects a single pin on a device to a single pin on another device. A device-to-device connection connects each pin on a device to the equivalently numbered pin on another device.
The devices/pins to connect are selected by typing in the auto-complete textboxes or by clicking the Select... button which brings up a dialog to select the device or pin.
For device-to-device connections, the Show Warnings checkbox sets whether a warning should be added to the project if there is a mismatch between the pins on the two devices.
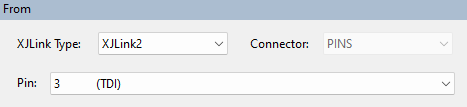
XJLink Connections
When adding an XJLink connection, the From section of the dialog will allow you to choose the XJLink type, connector and pin. The XJLink pins are shown with their pin number and their configured type from the Pin Mapping.
When XJLink connections are defined, pins on the XJLink which are not used as JTAG TAP pins, used in the Test Reset Sequence, or set to constant output values in the pin mapping can be configured in the pin mapping as PIO pins. These pins will then be used during Connection Test or XJEase to drive or read nets directly without using the JTAG chain. This functionality can be adjusted on the External Hardware tab of the XJRunner Setup screen.
Additionally, when using an FTDI C232HM cable as your JTAG controller, XJLink connections can be used to define the connections between the FTDI cable and the UUT.
XJTAG v4.3.0