XJDeveloper Tutorial
Introduction
Welcome to the XJDeveloper tutorial. This tutorial will show you the process of creating an XJDeveloper test project for a circuit using a worked example.
Follow-on exercises are provided at the end of the tutorial to show some of the capabilities of XJDeveloper which are often useful but not needed by all projects.
The tutorial describes how XJDeveloper works and provides instructions telling you how to perform the described operations.
- All instructions in the tutorial are highlighted like this.
Hardware setup
This tutorial assumes you have been supplied with an XJLink JTAG controller and an XJDemo board. You will set up tests for the XJDemo board during this tutorial. Depending on the model of XJLink you are using you may also have been supplied with adaptor boards so that you can connect the XJDemo board to your controller.
- Plug the XJLink into your PC using the USB cable supplied with your XJTAG system.
- Connect the XJLink to the JTAG connector on the supplied XJDemo board.
- If you are using an XJLink2 a 20-way ribbon cable is supplied for this purpose.
- If you are using a PXI-XJLink2 then the adaptors and additional ribbon cables supplied with your system will allow you to connect to the XJDemo board.
- If you are using an XJLink-PF series controller you will have been supplied with an adaptor board which plugs directly into the JTAG connector on the XJDemo board, and two ribbon cables which should be connected from the adaptor board connectors labelled A and B to the corresponding A and B connectors on the XJLink.
- If you are using an XJLink-PF series controller and adaptor board, also connect the adaptor board to your PC using the second supplied USB cable in order to power the adaptor.
Licence
You need to ensure that your XJLink contains a licence before you start.
- Open the XJLink Manager from the Start Menu (press the Windows key and type XJLink Manager).
- Select the XJLink that you are going to use in the tutorial.
- Check whether there is an XJDeveloper licence in the list of licences below.
- If no licence is present, then you should have been supplied with an authorisation code via e-mail. To install, click
 Add Licence..., paste the supplied code into the dialog box and click OK.
Tutorial structure
- Circuit overview
- The tutorial begins by introducing you to the XJDemo board with links to the data sheets for the major components in the circuit.
- Creating the project
- The tutorial explains what information is needed to describe the XJDemo board in XJDeveloper. You will use that information to create a project, identify the power and ground nets and define the JTAG chain.
- Test Coverage, Pin Mapping and Connection Test
- When the JTAG chain has been defined, it is then possible to review the test coverage and run the Connection Test. You will be introduced to the test coverage analysis features, define the connection between the XJLink and the XJDemo board, and run the Connection Test.
- Non-JTAG device testing
- Using built-in models from the XJEase library, you will quickly be running effective and efficient tests for the non-JTAG devices in the circuit.
- Simple device testing
- You will review some simple scripts that test the push button and LEDs. This introduces the high level XJEase language and illustrates how easy it can be to create tests and improve test coverage.
- Running the Connection Test – Understanding reported faults
- You will run the Connection Test on the XJDemo board to demonstrate the different types of fault that can be found.
- Follow-on exercises
- The main tutorial will introduce you to the core aspects of XJDeveloper. The follow-on exercises show you some of the capabilities of XJDeveloper that are not needed on every board but which are often useful.
The tutorial can be navigated using the Previous, Home and Next buttons at the top and bottom of each page in the tutorial.
Check your XJDemo hardware
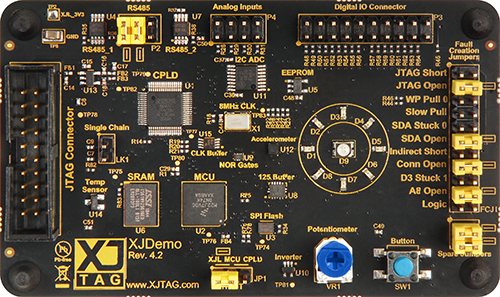
XJTAG has issued multiple versions of the XJDemo board over a number of years. This tutorial assumes you have XJDemo v4.2 as shown below, with "Rev. 4.2" printed on it next to the XJTAG logo. If you have a different version of the XJDemo board please contact XJTAG or your local distributor in order to get an updated board.
Clicking Next below will assume that you have XJDemo board version 4.2.
XJTAG v4.3.0