Revision Checklist
The Revision Checklist is designed to assist with the completion of the revision process and should be used in tandem with the XJDeveloper screens. This checklist remains open while the revision process is still ongoing, and will appear whenever a revision project is opened. The checklist contains items for the user to address. All items must be completed to complete the revision process.
Checklist Items
The items displayed in the checklist are broadly divided into three main groups:
 Tasks - Manual actions to perform to help you setup your project correctly. These should be addressed first.
 Suggested - Suggested device matches are the core of the Revisions feature and the majority of checklist items fit into this category. They allow you to review decisions the device matching algorithm has made and accept or reject its suggestions.
 Missing - Any categorised devices in the source project for which no match can be found in the revision will appear as missing devices.
Any items from these groups that are completed will be added to the fourth  Completed group. Any previously completed actions can be reviewed in this group. Many suggested matches will be automatically applied by XJDeveloper and will appear in the completed group. All completed matches will state whether they were completed automatically or manually completed by the user.
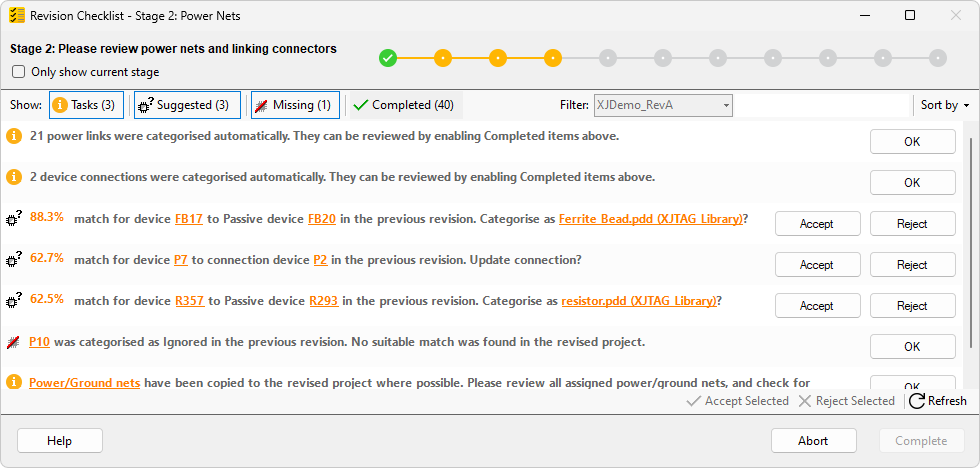
An example checklist item is shown below:

The icon identifies this as a suggested match item. These, and their completed counterparts, make up the majority of the checklist items. The message states which device in the current revision project is matched to which device in the previous revision (source project) along with the suggested categorisation.
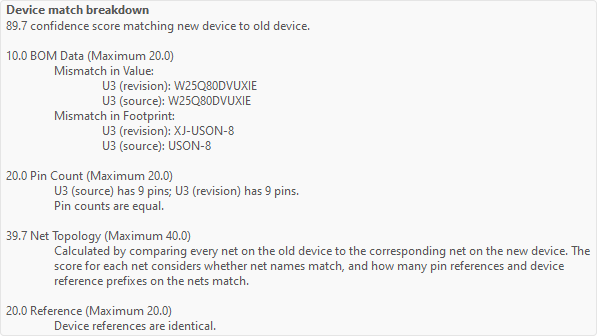
The percentage is a confidence score based on how likely the match between the two devices is correct. These are generated by the matching algorithm, which finds the most suitable matches between devices in the revision project and the source project. Hovering the mouse over the score will display a tooltip with a breakdown of the confidence score into several sub-categories (as shown below). Each sub-category has a contribution to the total score, one category may contribute more than another and the maximum contribution possible for each is also displayed. See the Revision Matching Algorithm page for more details on device matching.
The suggested match item has two action buttons, Accept and Reject. In general checklist items will have between zero and three action buttons. Clicking Accept applies the suggested categorisation to the device and updates any references to the source project device in the revision project to use the new device reference designator. See Updating Device References for more information. Clicking Reject will reject a suggestion, removing it from the checklist and preventing it from being displayed again.
Some suggested items may have three buttons, these are items where the revision device matches the rules for the Suggested Unfitted Devices Category. Click Reject to reject the suggestion, or click Unfitted to categorise the device as Unfitted. The third button is for categorising the device as the suggested match, much like the accept action for the standard suggested match item. However to keep things clear the button's text will match the suggested categorisation group (JTAG, Passive, Logic, Test, Ignored).
Completed suggestions have an Undo button option. This will undo the categorisation and any device reference changes, re-adding the suggestion back into the checklist.
Task and missing device items have a single OK button, which when clicked will complete the item, adding it to the completed items group.
Multiple items can be handled at once using the appropriate button on the bottom toolbar. If items from different groups are selected at once then the options available will differ. If any suggestions are in the selection then Accept selected and  Reject selected are shown. Either of these options will only be applied to suggested items within the selection, leaving any other items selected and in the checklist. If there are any task or missing items (and no suggestions) in the selection then OK selected will be available. Finally if only completed suggestions are in the selection then
  Undo selected is available and will undo the selected items.
The current checklist items may be affected by any changes made to the project, outside the checklist. If changes do occur then all items will be cleared. A single item will be left in the checklist instructing the user to click  Refresh to repopulate the checklist. Any changes made through checklist item actions will not require the checklist to be refreshed. Any changes to the project made by the checklist items can be undone/redone through the Undo and
  Redo options on the main XJDeveloper screen.
Filtering and Sorting Items
The four filter buttons on the top toolbar are used to select which groups of items are show in the checklist. If the buttons are checked (highlighted blue) then items for that group are displayed in the checklist. If they are unchecked then items in that group are not shown. Click to check and uncheck the buttons. By default the buttons for Tasks, Suggested and Missing are checked and the final button for Completed is unchecked.
Checklist items can also be filtered by board. The board selection drop-down box next to Filter: is used to select the board. Only revised boards are available in the drop-down, and the box is disabled if only one board is available. Select All boards to show items for all boards or select an individual board to display items related to that revised board or to its original board in the source project.
Checklist items can also be filtered by entering text into the Filter: box. The text of every item is searched case-insensitively for the given term, and only items containing that term are displayed.
There are several sort options for the checklist. The sorting method can be changed via the Sort by menu on the top toolbar. There are four sort options available to choose from:
- Default - the default sort option. The checklist items are grouped together by type, with tasks appearing first, followed by suggested matches and missing devices. Any completed items appear last. Within each group the items are sorted by the most relevant method; match score for suggested and completed matches, and device reference for missing devices.
- Source device reference - sorts any items that reference a source project device to the top of the list, and orders them by the device references. This does not retain grouping of items of the same type.
- Revision device reference - sorts any items that reference a revision project device to the top of the list, and orders them by the device references. This does not retain grouping of items of the same type.
- Match score - sorts any items with a match score to the top of the list, and orders them by the scores in descending order. This does not retain grouping of items of the same type.
View Options and Right-Click Menu
If the device categorisation for a suggestion includes a file or files, these are given in a hyperlink. Clicking this hyperlink switches to the relevant screen or window to view the file/files.
Any device or net reference designators are shown as hyperlinks. Clicking the hyperlink opens Explorer for that device. Right-clicking on the links or checklist items displays the checklist Context Menu.
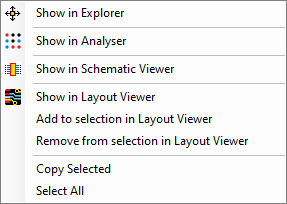
When right-clicking on a device reference designator the Context Menu View Option will apply to that device (which can be in either the source or revision project). When right-clicking on a match suggestion the View Options apply for both devices. Both devices will be shown in the chosen view option, which is useful when reviewing a suggested match.
 Explorer - Launches Explorer for the chosen net, device or devices.
 Show in Analyser - Displays the device in Analyser. This is only available for JTAG devices in the revision project.
 Show in Schematic Viewer - Launches the Schematic Viewer for the chosen net, device or devices.
 Show in Layout Viewer - Launches the Layout Viewer for the chosen net, device or devices.
- Add to selection in Layout Viewer - Adds the chosen device, or devices to the currently selected devices in Layout Viewer.
- Remove from selection in Layout Viewer - Removes the chosen device, or devices from the currently selected devices in Layout Viewer.
- Copy Selected - Copies the text from the selected checklist items to the clipboard.
- Select All - Selects all items in the checklist.
Additional options for viewing source project data are available for use within XJDeveloper, see Revision Source Project View Options for more details.
Revision Progress

The revision process is divided up into steps or stages, which can vary from project to project. Each stage is represented by a circle in the progress indicator at the top of the checklist (shown above). The current stage with a brief description is shown on the left side. The current stage name and number are also included in the checklist window's title bar. Any completed stages are shown as green circles with a tick. Stages with uncompleted items currently in the checklist are shown as yellow circles. Any stages not yet reached are shown as grey circles. No items will be currently included in the checklist for these stages. Hover the mouse cursor over a circle to display a tooltip with the stage name.
The Only show current stage checkbox limits the items shown in the checklist to the current stage (including items in the completed group). This is checked by default. Uncheck this to show items for all currently accessible stages in the checklist. The indicator will update to show which stages are currently available in the checklist, as shown below.

Some incomplete stages are still not accessible, even with Only show current stage unselected. The stages are grouped into three sections, and each section is not accessible until the previous sections are complete. This grouping provides structure to the process, while unselecting the Only show current stage option still allows for some flexibility to the order in which items are addressed within each group. It is recommended that stages are completed in order, however changes for any stage can still be made manually through XJDeveloper.
Completing the Revision
The Complete button becomes available when all items in the checklist have been completed. Clicking Complete removes any reference to the source project and saves the project as a standard XJDeveloper project. Any Explorer, Schematic Viewer, or Layout Viewer windows for the source project are closed and the checklist will no longer be available. Completing a revision cannot be undone.
The revision process can be aborted by clicking Abort. This will also close any windows and remove any reference to the source project, leaving it as a standard XJDeveloper project. The checklist will no longer be available after the process is aborted. Aborting a revision cannot be undone and any outstanding errors will have to be handled manually by the user.
See Also
XJTAG v4.3.0