Connection Test Error Types
- If connection test is not completing, but is instead displaying errors with the term Broken Chain in the output, see the Broken Chain Messages section for more help with this problem.
Hopefully connection test errors will be few and far between when your project is in production, but, especially during the project setup, you are likely to see some, either because you are debugging prototype hardware which may have more defects than normal, or because you are debugging your test project which may not be completely accurate at this stage.
Understanding the different types of connection test error can help you to debug problems more easily to determine whether they are assembly defects or project setup issues and to understand what needs to be done to fix any problem.
The following types of error can be found by the connection test:
- Open-circuit error
- Short-circuit error
- Stuck-at error (short to power or ground)
- Pull-resistor error
- Termination error
- Differential signal errors
- Logic error
- Another device driving the net
- Constant pin error
Note that some of these error types have multiple possible causes.
Open Found, Short Found
These two errors are the most likely errors the connection test will find and are frequently due to actual problems with the board, rather than test setup errors. An open (or open-circuit fault) is one where the connection test expects two pins to be connected but they aren't, whereas a short (or short-circuit fault) is one where the connection test expects two pins not to be connected when in fact they are.
Typical causes of opens or shorts can include poor soldering (either not connecting a pin to a pad or bridging two pads together) or physical damage (breaking a track or pressing two components together). However, it is possible for shorts or opens to be caused by a mistake in the project setup. As an example, a mis-categorisation of a device in the circuit as a resistor when in fact it is unfitted could lead to XJTAG expecting two nets to be connected that are not, and therefore incorrectly displaying an open-circuit fault..
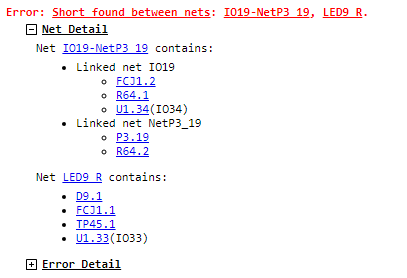
Figure 3: Error with expanded net details
Investigating shorts and opens can be done directly from the errors on the Run Tests screen, by expanding the error details as shown in Figure 3, or by right-clicking on the nets involved to find them in the schematic or layout and then investigating them on the PCB. Additionally, expanding the Net Detail will, for an open, attempt to show which accessible pins are on each side of the break. Typically, shorted nets will be shorted where the two nets are at adjacent pins on a device; this is likely to be where the fault has happened, perhaps from a solder bridge. The layout viewer is useful to show where nets have pins, vias or connections close to each other where a short might occur.
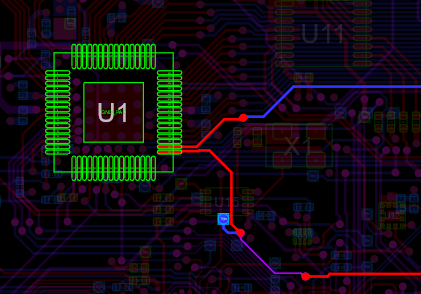
Figure 4: Layout view shows pins in close proximity on shorted nets
Resistive Shorts
Note that XJTAG can also find resistive shorts which can be a short on the other side of a resistor, or a short with high resistance, perhaps due to excess solder flux. If tests are finding a lot of false positives for resistive shorts, the sensitivity can be reduced. Go to the XJRunner Setup screen and in the Settings panel on the right, find the Indirect Shorts section and select Reduced sensitivity. Similarly, if you are seeing a lot of shorts to unconnected pins, this could be due to noise and the Ignore shorts to unconnected pins option will suppress these.
Inverted Shorts
The connection test may report an inverted short meaning that it appears that a net causes the opposite value to be read on another net. This may be caused by a short-circuit connection to a net without direct JTAG access (such as the input to some inverting logic), or could also be caused by a short-circuit to the negative side of a differential signal.
Stuck-at Fault
A stuck-at fault is a specific type of short-circuit, where rather than being between two data nets, the short is between a data net and either power (stuck at 1) or ground (stuck at 0).
They can be investigated in the same way as described above for shorts; displaying the net in the Layout Viewer and then looking for nearby power or ground net pins that are likely to be shorted to it.
Programmed JTAG Devices
If large numbers of stuck-at faults are found related to a single JTAG device, it is likely that the JTAG device has already been programmed. To solve this, the device should be blanked before testing if possible.
Unconnected Pins with Stuck-at Errors
Some JTAG devices have a fairly common error in the way that they implement the 1149.6 standard. Such devices will report stuck-at faults on all of their 1149.6-capable input pins that are not connected to any other device. These errors can be automatically ignored in the options for the JTAG device. To configure this, go to the JTAG Chain screen and double-click on the relevant device. Select the BSDL file, click Settings and then tick Ignore Stuck-at errors on 1149.6 pins in Connection Test.
Pull-up/down Net is Not Pulled Up/Down Correctly
This error can manifest in two forms, either Pull-up net is not pulled up properly or Pull-down net is not pulled down properly. As the error implies, this means that a net which has been specified as a pull-up or pull-down net is not showing the expected high or low signal.
This is often caused by an open-circuit fault between the test pin, the pull resistor and the power or ground line, but could also be caused by a short circuit to a net of the opposite type (a ground net for a pull-up or power for pull-down). Like a regular short or open, these can be investigated using the Layout Viewer. To help with tracking the problem down, XJTAG will attempt to show which component should be pulling the net and will warn you if there is a device on the net which has internal pulling.
Slow Pull Resistors
In some cases, it may take some time for the pull resistor to bring the pin to the required voltage. If this takes longer than the time taken to perform a JTAG scan, this error message may be displayed incorrectly. This can be compensated for by going to the XJRunner Setup screen and then in the Settings panel go to the Connection Test tab to set a Delay Between JTAG Scans. We recommend starting with a value of 10 000 TCK cycles between scans and increasing or decreasing that number as necessary, however please note that adding a delay in here will cause the connection test to take longer to run, so this should only be used if required and the value should be kept low where possible.
Error on Terminated Nets
A terminated net is expected to be connected to ground through a resistor or in the case of differential signals, the positive terminated to the negative through a resistor. This means that they should appear as a short under DC testing, but still be driven separately for testing differential signals. This error appears when the two nets are not connected.
To solve this, check that the resistor is present on the board and has been categorised correctly on the Categorise Devices screen.
Differential Signal Error Detected on Nets
This error is triggered when two pins which have been configured as carrying differential signals don't show different values when expected.
Even when a pair of signals is set up as differential when the board is running normally, XJTAG may still drive the signals to a common value at times during testing to maximise test coverage; however in some cases this can cause issues with other devices connected to those nets. This can be avoided - in the XJRunner Setup screen, in the Settings panel's Connection Test tab, tick the Always drive differentially checkbox.
This error will also be triggered if there's a short or an open on one of the nets, leading to the inverted signal not being transmitted properly and hence causing an unexpected result. It can be investigated in essentially the same way as a normal short or open, except that there may be some inverted signals in the error details which the operator needs to be aware of and understand.
The 1149.6 version of the JTAG standard allows for data to be sent using edge-sensitive receivers instead of level-sensitive ones, and this allows signals to be transmitted through capacitors. This means that capacitors can be detected and tested through a combination of 1149.1 DC signals and 1149.6 edges. This is often used with differential signalling.
Nets Appear Not to Have Expected Inverted Values
Inverted values are a part of differential signalling; errors like this one can be caused by an open circuit fault between the transmitting and receiving devices such as a missing capacitor or a short between the positive and negative legs of the signal. It can on rare occasions be caused by the source device not correctly sending out the inverted part of the differential signal, or by a signal being incorrectly labelled as a differential signal.
Unexpected Value on Logic Block or Logic Net
XJTAG tests logic on a board as a series of logic blocks, where a logic block may consist of multiple logic gates between some inputs and outputs. Values are fed into the logic block from JTAG devices (or test points via External Hardware), and output values are read – if the output signals don't match the expected results, you will see this error.
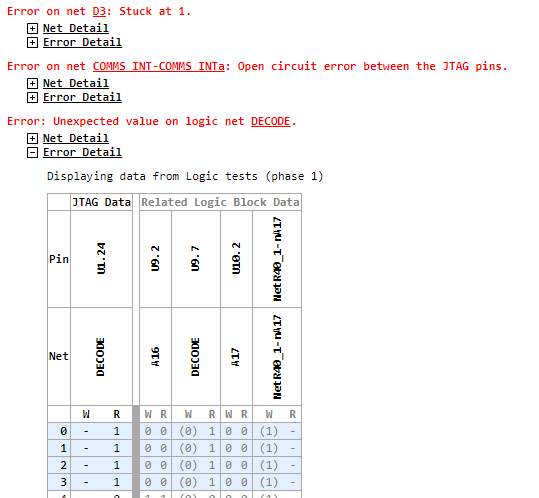
Figure 5: Logic errors often have related errors and show additional data for related nets
This type of error can have many root causes, including short or open circuits inside the logic block, malfunctioning or missing logic devices or mistakes in the circuit design. As a result of this, errors on logic blocks are often reported in conjunction with other errors on the nets attached to the logic.
A logic error therefore also shows the values recorded on all nets attached to the logic block, if available, when you expand the Error Detail in the output. If the logic is expected to be driving these nets, the expected driven value is shown in parentheses.
The logic error output from the connection test will narrow the location of the error down as much as possible and will show which inputs cause unexpected outputs. This, alongside any errors on related nets, gives the operator a starting point to trace the signals through the logic devices until they find the location of the fault. However, often there is more than one possibility that can result in the values that are read and so the user may need to do more investigation.
Error on Net: Either Shorted to Another Net or a non-JTAG Device is Driving the Net
If a pin's state is changing in a way that doesn't match other changes being made by XJTAG it means that something else must be driving it. This is most likely to be other circuitry on the board, but the issue could also be caused by the net having a short to a non-JTAG controlled net or by a device on that net not being correctly disabled and driving signals during testing, or even by multiple shorts to different nets.
The first step is to check other devices that should be connected. If there's a signal being deliberately transmitted on that net, perhaps from a clock, a sensor or any other device, this should be disabled if possible – typically by using a chip enable signal. If the other device can't be disabled, the JTAG pin on that net can be set to Excluded in the constant pins feature, telling XJTAG to not to drive or read it. This means that the net won't be covered by the connection test, but that's OK – it's not always possible to test the entire board. The Test Coverage screen will automatically update with this information.
If there shouldn't be a signal on that net, perhaps because any active devices on that net should be disabled or XJTAG should have control over them, the next step is to check for a short to another net on the board which could be carrying the signal, and so the standard process for finding a short should be followed as above.
Net was Expected to be Kept at a Constant Value...
If a pin is set to a constant value of IsHigh or IsLow in the Constant Pins screen, the connection test will check to ensure that the pin stays in the expected state. This error means that the signal has been read in the incorrect state.
This error could be caused by a short or open, or by the constant pin being configured incorrectly. If you are sure that the circuit is OK, and this error has been triggered incorrectly, set the pin to have a constant value of Excluded instead of specifying the level. This will cause connection test to ignore the values it reads from the net.
XJTAG v4.2.5