Overview of Explorer
An Explorer window can be opened in various ways. The easiest method is to right-click on a reference to a device, pin, or net on one of XJDeveloper's screens and to select Explorer from the context menu.
Alternatively, it can be launched using the hotkey Ctrl + E, selecting it from the View menu on XJDeveloper's menu bar, or by selecting Tools > Explore from the menu bar and choosing Device..., Net..., or Pin... depending on the type of item you want to check. When opened from the Tools menu, a dialog will open first to allow you to select the required item.
Figure 1 shows a typical Explorer display:
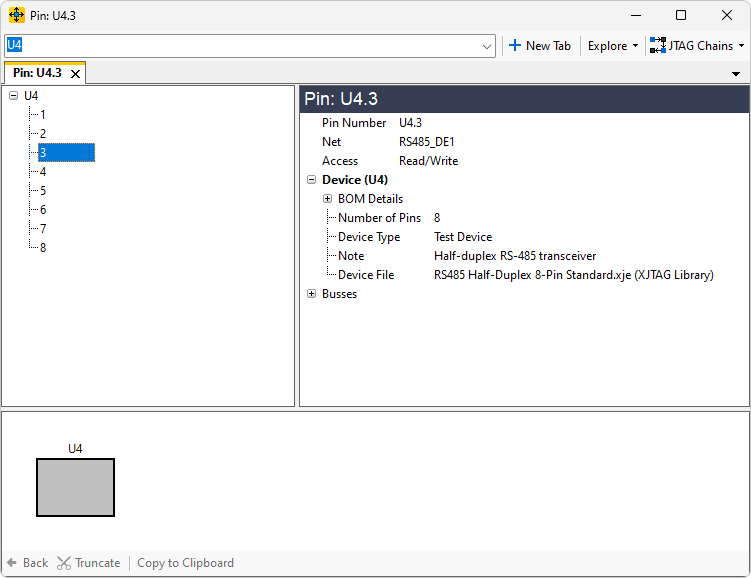
Figure 1: Overview of Explorer Window
If you entered Explorer by right-clicking an item on one of XJDeveloper's screens, the chosen item will be shown in the upper left primary navigation pane, and information about it will be displayed in the upper right pane.
If you used the hot key to open an Explorer window, the panes will be blank or display the last item that was viewed, and you will need to select the pin, device, or net of interest. This can be done by using the search box and entering the reference to a device, pin, or net. Start entering the required reference, and the search box will offer suggestions as you type. Pin numbers are entered with the format <device reference>.<pin number> (for example: U1.7).
Alternatively, you can click the Explore button (see Figure 1 above) and choose Device..., Net..., or Pin... from the menu. This opens a dialog in which to select the required item.
The information displayed in the upper right pane will depend on the type of item selected.
- Devices:
- Data from the BOM file when available (and key information from the BSDL file if it is a JTAG device)
- The categorisation of the device (e.g. Logic, Passive, Test, Uncategorised, etc.)
- If a device file has been assigned, the filename will be shown and (if appropriate) the library from which it was taken.
- For logic devices, how the gate's signals are allocated to pins
- The number of pins
- The pin list, showing the nets connected to each pin, the level of access to each pin, and any disable values and constant pins that have been set (constant values will appear in the Net Disable Value column)
- The device's bus list, showing which pins make up each bus and the level of JTAG access to each bus.
- Pins:
- BOM data for the device when available
- The net(s) to which it's connected
- Any constant pins and disable values affecting this pin
- The level of access that a JTAG device has to this pin (unless it is on a JTAG device )
- If on a JTAG device, details of the pin's boundary scan cells and their capabilities
- Any busses of which this pin is a member
- If on a terminating or pull resistor, details of the pull or termination
- Nets:
- The net category (if a power or ground net)
- The number of connected pins and nets
- The names of any linked nets (i.e. those connected by linking devices such as ferrite beads)
- The level of access that a JTAG device has to this net
- Details of any pull resistors connected to this net, their values, and the net to which they pull
- Any disable values affecting this net
If the pin or net being investigated is connected to a device categorised as Logic, details of the pins for that gate will be provided below the left navigation pane (see Figure 2). If a selected pin is involved in any Connections, those connections will be shown in the same place. If the pin connects to both a Logic device and a Connection, the details will be shown in separate tabs.
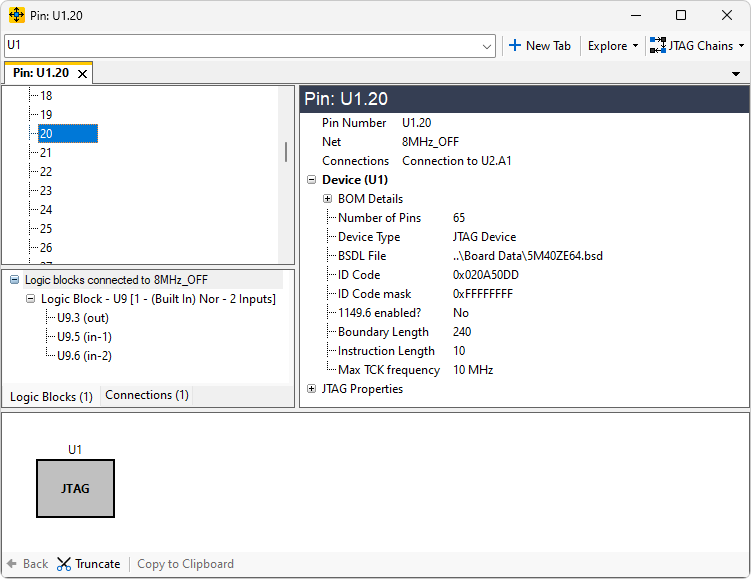
Figure 2: Displaying Information on Connected Logic and Connections
At the bottom of the Explorer window is a graphical navigation pane. This is described below in the section on Following a Signal Path Using Explorer.
Comparing Information Using Multiple Tabs
Information on different nets, devices, or pins can be compared by opening a second tab in Explorer: click on the New Tab button in the toolbar and then search for the new item. By default, one tab will be shown at a time, but they can be re-arranged to be displayed side-by-side or one above the other. See the XJTAG Help on Docking Window Use for more information on adjusting the layout.
XJTAG v4.3.0