Preparing the Revision
To get started creating a revision, use XJDeveloper to open the existing project that the new revision will be based on. At this stage, you need to tell XJDeveloper where to save the revised project, whether the test device files are to be shared and how to import the data files (netlist, BOM and schematic) for the new revision.
- When complete, a revision becomes a normal XJDeveloper project, so you can carry on making revisions as the design evolves (e.g. Rev B to Rev C).
In the File menu, select Create Revision... to start the process, as shown:
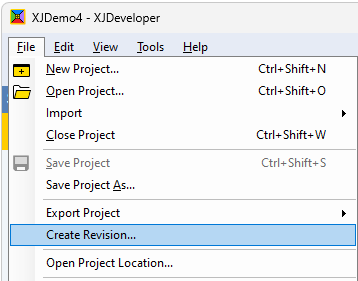
Figure 1: Creating a Revision
This will display the New Revision dialog box where the initial steps are performed.
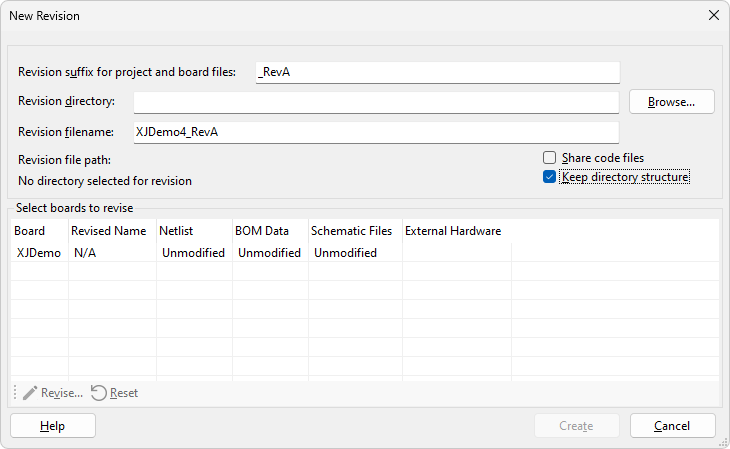
Figure 2: Configuring the file locations and board data
Project files and location
In the upper part of the dialog in Figure 2, you can choose how the new project will be saved, specifying the filename and location, plus whether files are shared with the previous version. By default, the new project for the revision will be named after the original version, with a revision suffix added, however you can change this suffix to match your company's naming convention by editing the suffix field at the top. Alternatively, if the name change is more complex, simply remove the suggested suffix and specify the filename manually by typing the new name into the Revision filename field.
You will also need to choose a Revision directory to save your new project into. If you save the new project to the same directory as the original, any future updates to test files in one version will also affect the other. This can be convenient if you're still developing the tests on the original project, but may also cause problems as you continue to develop either project as the test files may stop being compatible with the other one. Alternatively, if the original project is completed and not to be changed, you can save it to a different directory. If you do choose to use a shared directory but change your mind later, you can move one of the projects out by using Save Project As... or Export Project from the File menu to create a new, separate version.
- Before making a revision of a project created in a previous version of XJDeveloper, XJTAG recommends that you ensure the original project still works with the latest version of XJDeveloper. Next, update the library files, and check that this hasn't introduced any problems. Once these checks have been performed, it is safe to start the revision.
- The Share code files option allows you to share the test and logic files between the projects, even if they're not stored in the same directory. This is very rarely necessary, but could be useful if a project folder name specifies the revision name or number; this would require a new revision to be in a different directory, but you want to refer to files in the original project.
Import the new board data
Next, you need to specify the new netlist(s) for the board(s) in the project. Select a board which has changed, as shown in Figure 3, and then click the Revise button (1). This will open the Revise Board dialog, which is identical to the Add Board dialog that was used to create the project in the first place. From here, you can change the name of the board (2) and browse for a new netlist (3).
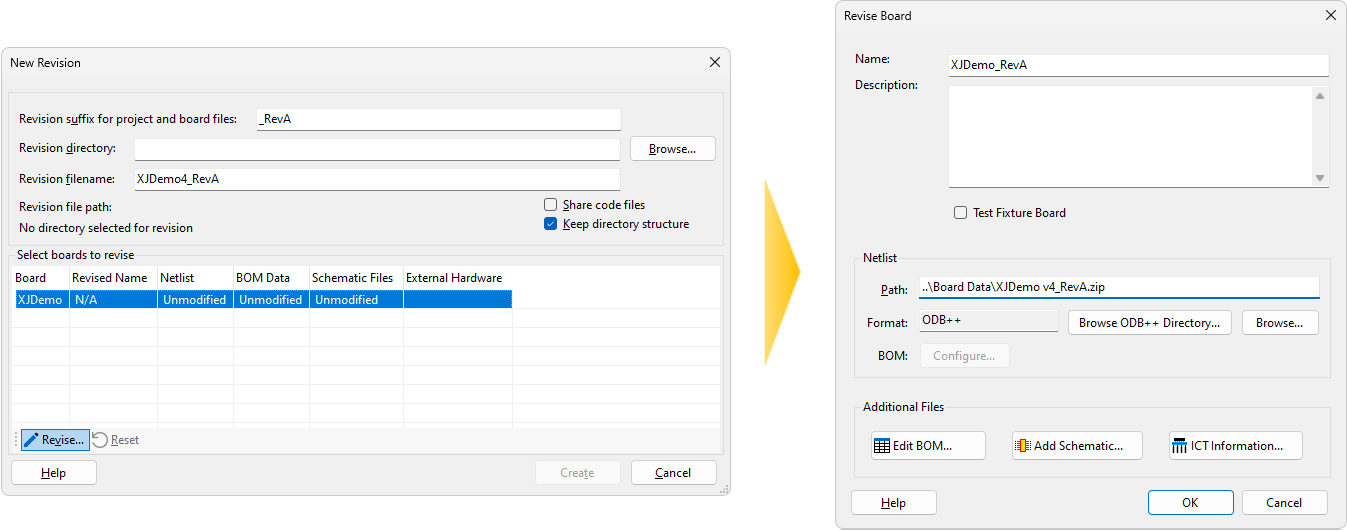
Figure 3: Assigning the board data files
Import the new schematic
Use the Add Schematic... button as shown in Figure 4 below to replace the schematic from the original project with the new one.
- Because multiple schematics can be added to a single project, this interface requires you to remove the old schematics manually.
In the Assign Schematic Files dialog, use the Remove button to delete old schematic files and the Add... button to import their replacements. If the schematic contains BOM data, you will be asked if you want to use it – generally, you will say no here if you have a separate BOM file, because the BOM is likely to be more complete, accurate, and up to date. This is covered in more detail in the Entering Board Information user guide.
- If the original project used BOM data from the schematic, the new revision should also use the schematic's BOM data to ensure that the device data structures are as similar as possible to aid with the mapping process.
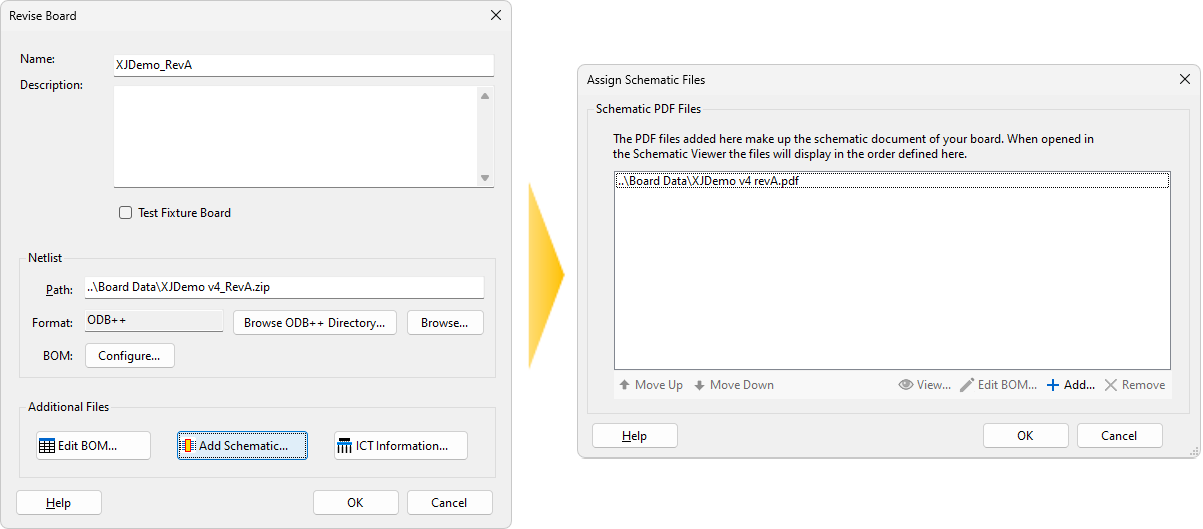
Figure 4: Setting the schematic for the board
Import the New BOM
- A BOM file isn't compulsory when creating a revision, however XJTAG strongly recommends that if the BOM is missing from the original setup, that you add it before creating the revision. This is because the BOM data gives the Revisions system a lot of the information it uses to match the devices.
- It's important to ensure that the structure of the BOM data matches the previous revision as this data has a large influence on matching the devices on the boards later, regardless of whether this is a strictly accurate assignment of the data. For example, part numbers and component values should be in the same format as before.
After the schematic, the next step is to update the BOM – click Edit BOM and then Browse... as shown in Figure 5. In the Choose BOM files for import dialog, select the new BOM, followed by Open, then back on the Edit BOM dialog, click Next.
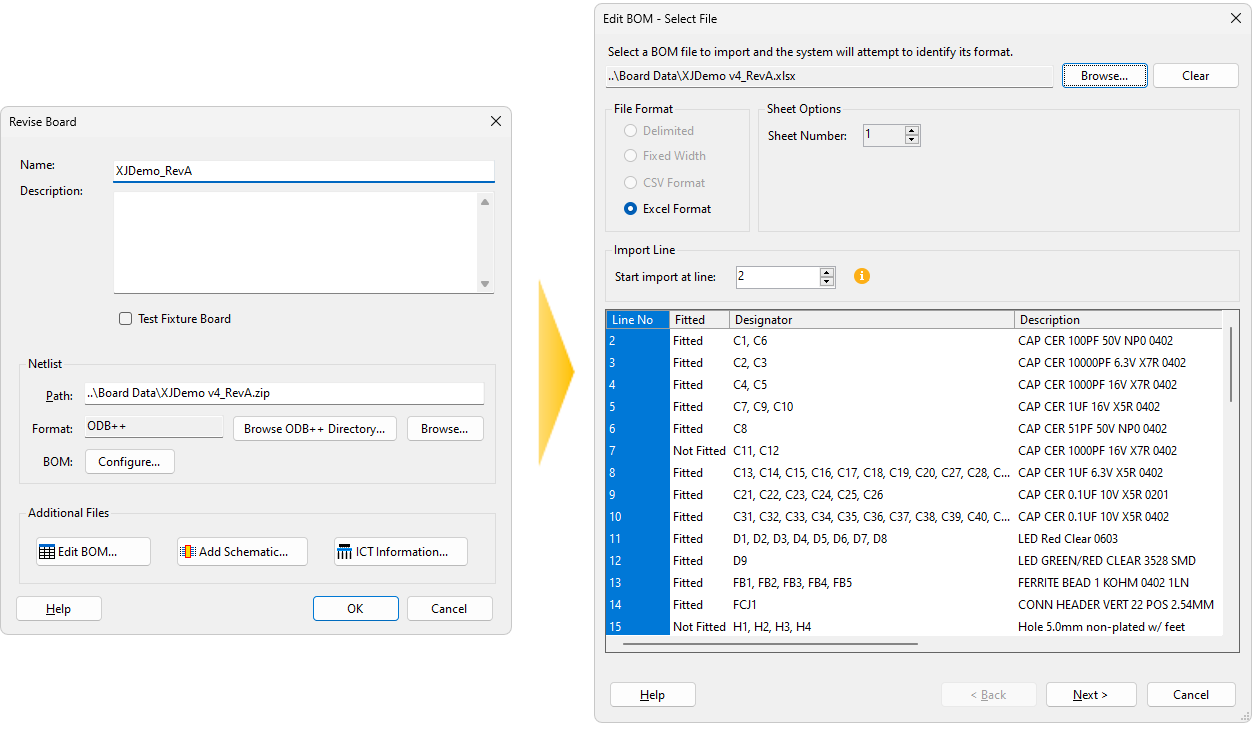
Figure 5: Choose BOM file
You now need to tell the Revisions wizard where to look in the BOM for each type of information – this is the same process as covered in Importing BOM Data in the Entering Board Information chapter of the user guide. You can compare the new BOM data to that from the previous revision by selecting the Previous BOM button in the top right to display the columns and assignments from the previous revision; this should allow you to match the data between the two versions.
Once the columns are configured, click Next, check that each column contains the expected type of data and then use Finish to return to the Revise Board dialog (Figure 3).
Finishing Board Configuration
Once all the files are assigned, click OK on the Revise Board dialog to complete the settings for that board. If you have multiple boards to revise, select the next one in the list which has changed on the New Revision dialog and follow the steps from Import the new board data onwards. Repeat this process until all revised boards have been updated.
- You may not need to update every board in your project; only boards which have been modified need to have their files updated in the Revisions process.
Generate the Project
Now you can click Create on the New Revision dialog (Figure 6) to generate the project for your new revision.
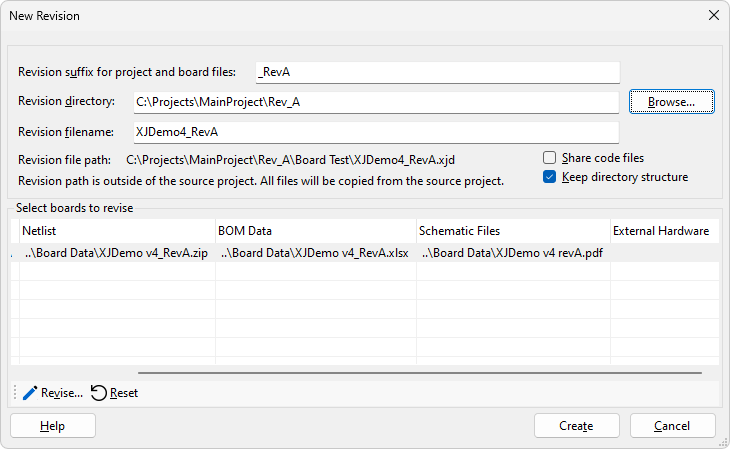
Figure 6: Updated New Revision dialog
This step will create and open the new XJDeveloper project, making a copy of files that aren't shared, and start the Revision Checklist wizard. If the original project refers to any files that are stored outside its project folder, a dialog will pop up to warn you that these files have not been copied – it is up to you to decide whether you're happy with these files being shared or would like to make separate copies manually. The software doesn't mind how you arrange these files on disk, however we recommend that you have a company standard for project structure, to ensure that you can always find the relevant files for a specific project.
This step creates the new project, however the two projects are linked together until you click Complete, right at the end of the wizard. This means that any changes made to the source project will be carried over into the revision when it is next opened, updating the revision as applicable.
XJTAG v4.3.0