Creating an XJLink Instance
Before a test can be run, the XJLink object must be initialised. This process will establish communication with the JTAG controller and prepare it for use.
In C#, this is done as follows:
var xjlink = XJLink.GetXJLink();
By default, it will use the first XJLink it finds. However, if several XJLinks are connected, the desired one can be used by passing in a string for the appropriate serial number. As an example, in C# this might be:
var xjlink = XJLink.GetXJLink("12345");
In LabVIEW, an XJLink can be initialised using InitialiseXJLink.vi as shown Figure 3 (taken from XJTAG Multiple Test Runs.vi, although it can also be found in the other examples). Again, if a serial number is not provided, the system will initialise the first XJLink to be found. A refnum for the controller that has been initialised is returned, which will subsequently need to be passed to other VIs, e.g. to specify the XJLink to be used when creating a Runner instance.
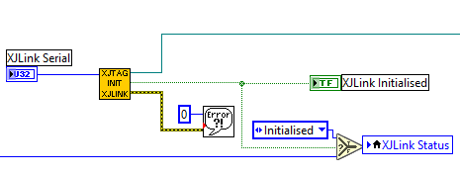
Figure 3: Initialising an XJLink in LabVIEW
XJTAG v4.3.0