Customising the Detail Shown in Results
Depending on who will be running the tests, you may wish to change the level of detail presented in the results. For example, if XJRunner is being using in an R&D lab for testing early prototypes, a full results report may be desirable. However, if it is being used on the high-volume production line of a factory, it may be more appropriate to present only a single pass / fail result.
Removing Test Status, Hyperlinks, and Summary Table
Test results can include status information on what the test is doing and hyperlinks to help with debugging as shown in Figure 2 below. This information comes from print statements in the XJEase code.
This can be reduced to just simple pass / fail statements for each test:
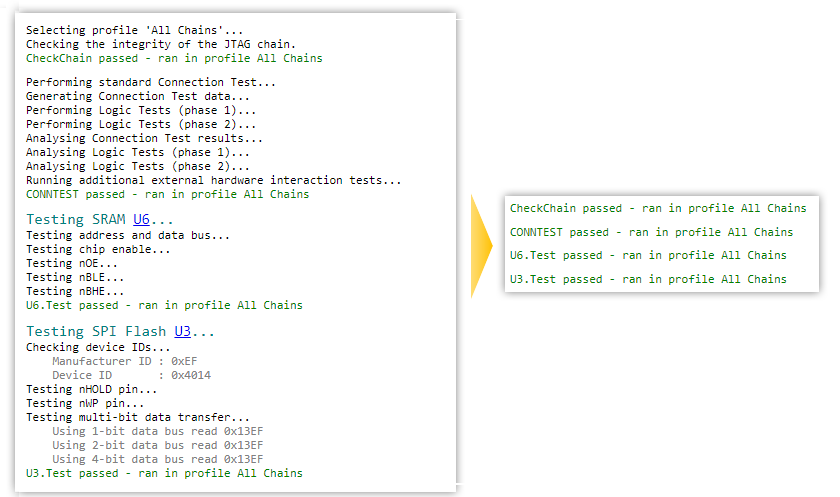
Figure 2: Reducing Details Shown in Test Results
The level of detail displayed is controlled by settings in the Test Output tab. Remove the tick from the Enable detailed test output checkbox to switch to a simplified results display:
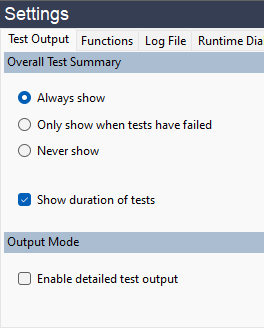
Figure 3: Changing the Level of Results Detail Displayed
- Tests might be using PRINT statements for user interaction – for example, to ask the operator to adjust something during a test. It is important to note that disabling the detailed test output will also suppress those prompts. If the detailed output style is not being used, you may therefore need to consider how the XJEase code is written so that pop-up dialog boxes can be used instead of PRINT.
- The log file captures what is sent to the screen. Disabling detailed output will therefore also stop detailed data being saved to the log file.
By default, an Overall Test Summary box is displayed at the end of the test results:
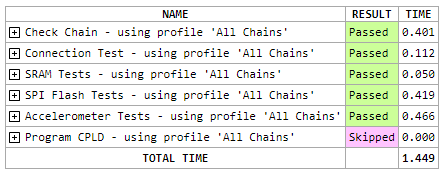
Figure 4: A typical Overall Test Summary Box
A configuration for when this summary box is displayed can be set via the radio buttons shown in Figure 3 above. It can be configured to always be shown at the end of tests, to be shown only if one or more of the tests has failed, or never to be shown.
The Overall Test Summary box (Figure 4) will include test durations by default, which can be useful when optimising the test run time. To stop showing this information, remove the tick from the Show duration of tests checkbox (Figure 3).
Changing the Level of Detail Displayed by Connection Test
Several options can be used to control the level of detail that is displayed by Connection Test: go to the Settings section of the XJRunner Setup screen and select the Connection Test tab as shown in Figure 5 below.
The settings in the top part of the control are used to control what will be displayed in the connection test results:
- The level of net information
- Whether or not status messages are shown
- Reduced output when using test fixture boards
- Detailed information for all nets used
These settings are described in the following subsections.
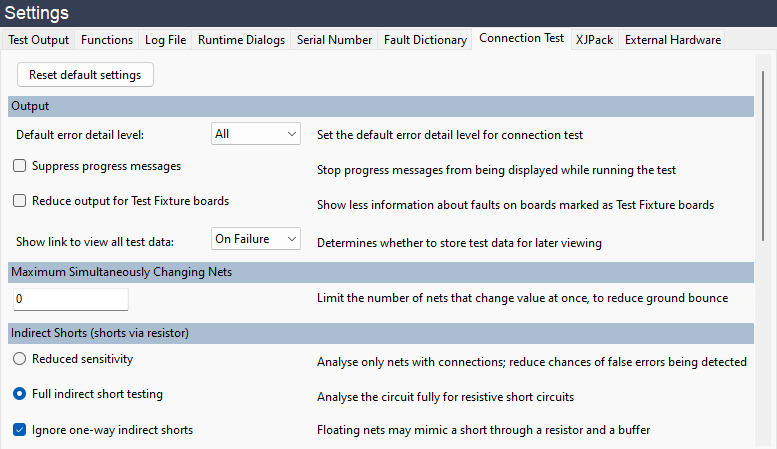
Figure 5: Setting the Level of Detail Displayed by Connection Test
Displaying Error Detail at Net Level
If Detailed Test Output has been enabled and Connection Test fails, information about the failing test will be displayed. By default this includes both Net Detail (a list of pins on the affected net) and Error Detail (a table showing the write patterns used on the affected pins and what was read):
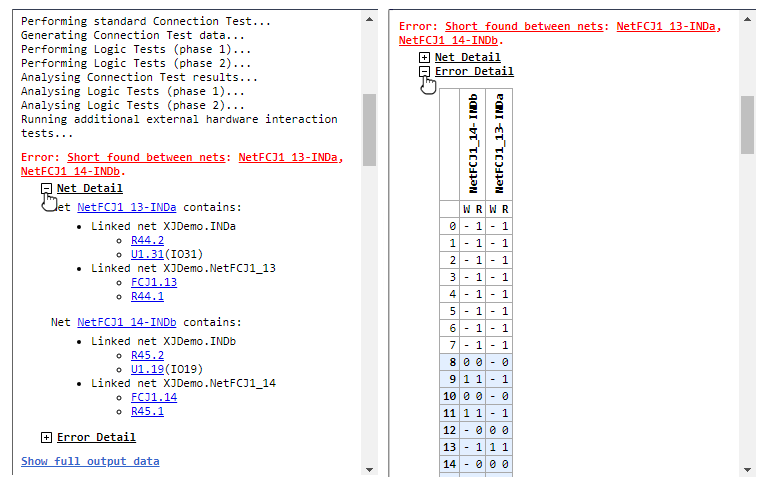
Figure 6: Error Details Shown in the Results Output
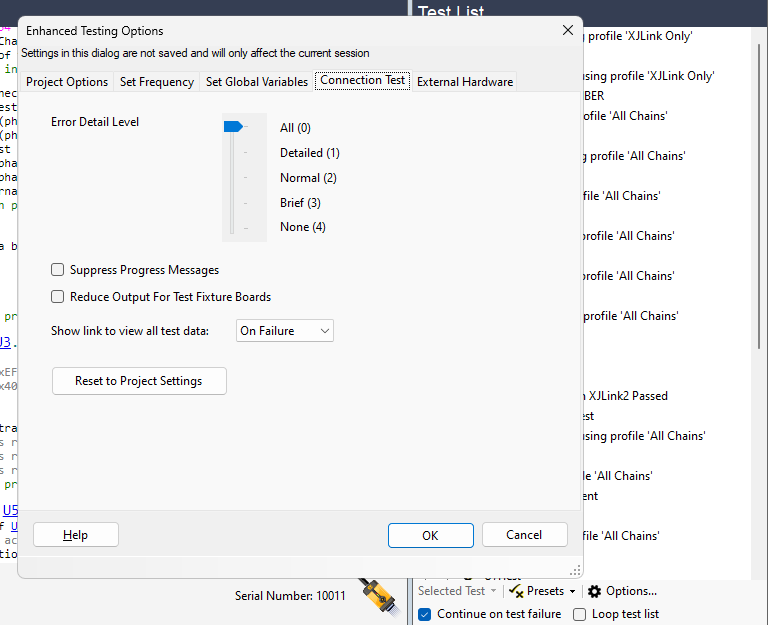
To change the amount of detail displayed, select the required level from the Default Error Detail Level dropdown menu shown as (1) in Figure 5 above.
| Amount of detail from Connection Test to be displayed | Settings in the Connection Test tab |
|---|---|
| To display both Error Detail and Net Detail (see Figure 6) | Select All from the menu |
| To display only the Error Detail (i.e. not show the Net Detail) | Select Detailed from the menu |
| To display only the Net Detail (i.e. not show the Error Detail) | Select Normal from the menu |
| To display only the name of the affected net(s). Do not show Net or Error Detail. | Select Brief from the menu |
| Only show overall pass / fail of the Connection Test | Select None from the menu |
Table 1: Connection Test detail levels
There are two additional configurations that can be used to reduce the amount of data presented: one that suppresses progress messages during the Connection Test, and another that limits the displayed data for test systems that include a test fixture board.
Suppressing the Connection Test's Progress Messages
By default, the status of the Connection Test is shown by a series of progress messages:
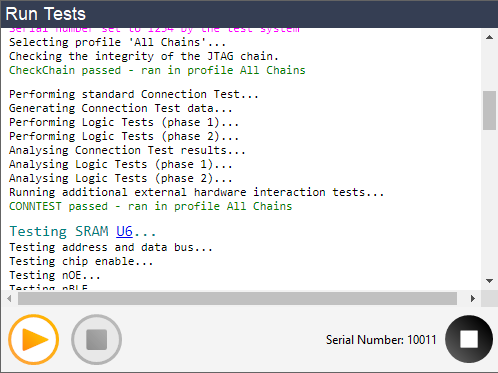
Figure 7: A Connection Test's Progress Messages
To stop these being shown in the results output, place a tick in the Suppress Progress Messages checkbox (2) shown in Figure 5 above.
Reducing Test Output When Using Test Fixture Boards
If a board in the project is being used as a test fixture, it can be desirable for the results to report only nets that are on the board being tested rather than including the nets that are on the test fixture board. Provided the board was defined as a test fixture when the project was created, results relating to its nets can be suppressed by adding a tick to the Reduce Output for Test Fixture Boards checkbox (3) illustrated in Figure 5 above.
- The same settings for the amount of detail displayed during a connection test can be changed temporarily on the Run Tests screen using the Options button at the bottom of the test list:
- These configurations also affect the data entered in the log file: reducing the Error Detail Level setting (from either location) also reduces the level of detail saved to the log.
Displaying Details For All Nets Used During a Connection Test
The Error Detail information described above (see Figure 6) is a summary view that shows only the scan data related to the error. The full set of scan data can be viewed by clicking a “Show full output data” link that can be included in the results. To determine when this link is displayed, use the pull-down menu (4) in Figure 5 above to select between Never, On Failure, and Always.
- Generating the full report adds several seconds to each board test and increases the size of the XJLog file. It can provide useful additional information when talking to XJTAG Support but should be disabled afterwards to avoid performance issues.
XJTAG v4.3.0