Using the Schematic Viewer
The schematic viewer can be opened in XJDeveloper by right-clicking on a reference to a device, pin, or net, and selecting the appropriate option from the context menu (provided the project contains a searchable PDF schematic). This will open the viewer with the appropriate device, pin, or net highlighted. It can also be opened by right-clicking hyperlinks in items such as Connection Test's error reports and XJEase output text.
The schematic viewer can follow your selection in Explorer, the  Categorise Devices Screen, and the
  Power/Ground Nets Screen by ensuring the Follow Selection toggle button is enabled.
The schematic viewer is also available in XJInvestigator and XJRunner if the currently open project was exported from XJDeveloper with schematic data included.
- The schematic viewer can also be opened at any time by using any of the following methods:
- use the Ctrl + K keyboard hot key
- select View > Schematic Viewer from XJDeveloper's menu bar
- select Tools > Schematic Viewer from XJDeveloper's menu bar and choose Device..., Pin..., or Net...
- click the
 button on XJDeveloper's toolbar
This section covers the following topics:
- Panning and zooming in the schematic
- Finding a net, device, or pin by searching for its name
- Using text in the schematic as the basis of a search
- Displaying additional PDF files alongside the schematic
- Changing the colours used for highlighting
Panning and Zooming in a Schematic
The cursor can be switched between 3 modes – Pan, Text Selection, and Zoom In. The required mode can be selected from the Tools menu or by right-clicking anywhere on the schematic and choosing from the context menu.
When in Pan mode, the cursor takes the shape of a hand and allows you to move around the schematic by holding down the left mouse key and dragging.
Text Selection mode allows any text on the schematic to be copied. This is useful for copying device part numbers to the Windows clipboard for use in other applications and when searching for nets, when it allows text from the schematic to be pasted into the Viewer's Search box.
Switching to Zoom In mode allows you to zoom to a particular section of schematic. In this mode, the cursor takes the form of a magnifying glass. Hold down the mouse's left key and drag the cursor to draw a box around the area to zoom into. Releasing the mouse key will then zoom into that area.
- Zooming can be performed in all modes by holding down the Ctrl key and using the scroll wheel or the keyboard's + and - keys; or by using the + and – buttons in the toolbar
Finding a Net or Device by Name
The Schematic Viewer's search facility has two options – Text Search and Netlist Search. They are selected from the dropdown menu beside the search box as shown in Figure 19. The text search will search for any text in the schematic, whereas the netlist search is limited to information found in a netlist (net names, device references, and pin numbers).
The netlist search is only available if the PDF file has been assigned as a schematic for a board in the XJDeveloper project.
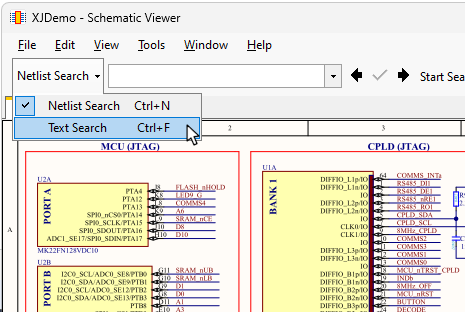
Figure 19: Searching Within a Schematic
By default, the search will be in Netlist Search mode if it's available. The syntax required to find a pin via this search box is <device name>.<pin>, for example U7.2 or U8.A3. Typing the initial characters of the search string will bring up a list of matching names in a dropdown menu. Clicking the item on the list will then attempt to find the relevant net, device, or pin on the schematic.
The search will find any matching item. For example, searching for a net called D2 could find the diode D2 and the ball D2 on any BGA devices as well as the required net.
- Some CAD systems such as Altium embed bookmarks into the PDF file. If this type of file is being used, XJDeveloper will try to use this additional information to go directly to a net when it's clear that's what you're searching for, i.e. if Schematic Viewer was launched by clicking on a net in Connection Test output or by right-clicking a net in Explorer.
- If you search for a net by its name in the netlist, but the net is not labelled on the schematic, the Schematic Viewer will show you pins on that net instead.
If the intended item isn't found first time, use the arrows at the top of the screen to cycle through any other possible matches until the correct one is located (see Figure 20). When the correct item is found, click on the green tick at the top of the screen. This tells Schematic Viewer that this is what you were searching for; from then on, it will always jump to that point first when that particular search is made (retained after closing the project).
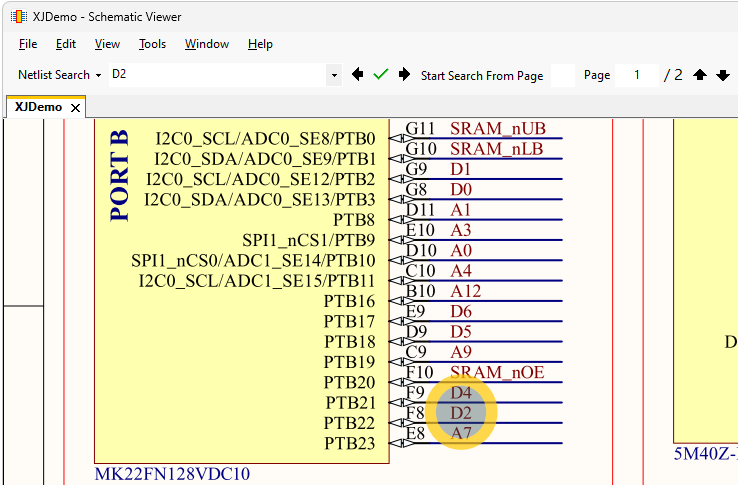
Figure 20: Navigating Between Search Finds in Netlist Search Mode
- The green tick is only available in Netlist Search mode.
In Text Search mode, you can search for any text by typing into the search box at the top of the screen.
Using Text from the Schematic in a Search
When reading the schematic, you may want to trace a particular net through the circuit diagram. This can easily be done in Schematic Viewer by highlighting text on the schematic and sending it to the Search box. For example, to find the other places in the circuit where a net is connected, highlight its name in the schematic and send the text to the Search box. This is done as follows:
- Enter Text Selection mode by right-clicking anywhere in the schematic and selecting the mode from the menu.
- Highlight the text of interest either by dragging the mouse or double-clicking on it.
- Use Ctrl + N to place the highlighted text into the Netlist Search box.
- Use the keyboard's Enter key to find the text.
- Continue to use Enter to jump to subsequent occurrences of the text as required. To jump back to a previous occurrence, use the left arrow at the top of the screen.
- If the net names used in the schematic change between hierarchical blocks of the circuit, it may be easier to trace the net using Explorer. Points in the circuit found with Explorer can then be displayed on the schematic using Explorer's right-click menu.
Viewing Additional PDF Files Alongside the Schematic
It can sometimes be useful to view an additional PDF file alongside the schematic, for example the board's mechanical drawings or another circuit diagram. This can be done by using File > Open Schematic from Schematic Viewer's menu bar, which opens a dialog box similar to the one in Figure 21 below.
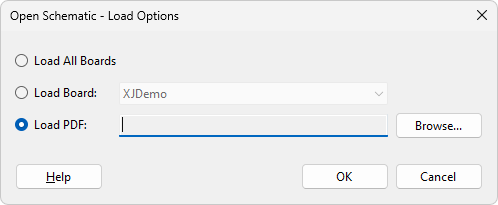
Figure 21: Loading Additional PDF Files
| Requirement | Action | Comment |
|---|---|---|
| Load the schematic for another board in the open project. | Click the Load Board: radio button and select the board from the dropdown menu. | |
| View 2 parts of the same schematic side-by-side. | Load the schematic a second time as described above, and re-arrange the tabs to display the schematics alongside each other. | See below for details of how to re-arrange Schematic Viewer's tabs. |
| Load all schematics for the current project | Select the Load All Boards radio button. | Each schematic will open in a separate tab. |
| Load a schematic for a board that isn't in the open project. | Click the Load PDF: radio button and use Browse... to select the required file. | A schematic loaded in this way rather than as part of the project will not have the netlist search facility. |
| Load another PDF file such as the board's mechanical drawings. | Click the Load PDF: radio button and use Browse... to select the required file. |
The file will be opened in a new tab. By default, one tab will be displayed at a time, but it is possible to re-arrange the tabs so that files are shown side-by-side or one above the other by dragging the tab's title to cause the docking icons to appear as shown in Figure 22 below. Refer to the XJTAG Help on Docking Window Use for more information.
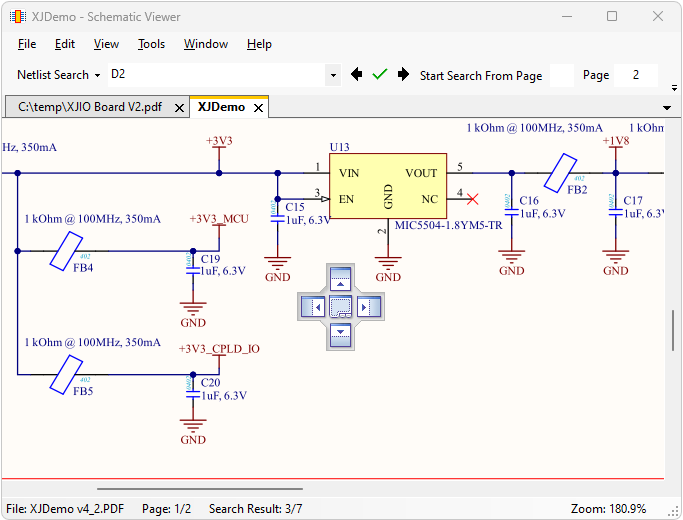
Figure 22: Tabs can be re-arranged to view schematics and files side-by-side
Changing the Colour of the Highlight
Depending on the colours used in your schematic, you may need to change the highlighting colours. These are set by the options in the toolbar at the top of Schematic Viewer's window:
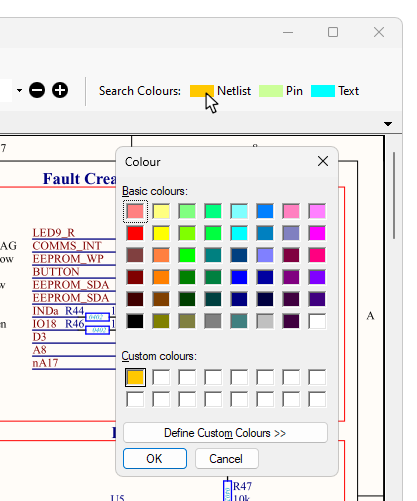
Figure 23: Changing the Colours Used for Highlighting
To change the colour, click on the relevant option and select a new colour from the dialog box.
XJTAG v4.3.0