Creating a Dynamic Chain Project
This section explains the steps to follow to set up a project using dynamic chains.
Before dynamic chains can function, the pin mapping and the individual JTAG chains must be created. Once these have both been defined, the process is as follows:
- Set up the subchains.
- Configure profiles by defining which subchains they contain and the order in which the subchains are started.
- Select the default profile to be used in the test list.
- Create any Test Reset sequences that will be needed to initialise the subchains.
- From XJTAG 4.0, in new projects, XJDeveloper will automatically generate a subchain for each TAP group, containing all the available devices in that group and all available External Hardware. It will also create a single profile containing all of the subchains. This is done to allow the Optimised scans feature to operate by default without users having to do any setup, but it also means that a start has been made to any more complex dynamic chain setup that may be required for your circuit.
- To edit dynamic chain configuration, the JTAG chains must already have been defined. If that has not yet been done, refer to the chapter on Defining the JTAG Chain.
- The chains defined must contain the maximum possible set of devices – for instance, in the example of Figure 2, two chains must already have been defined, the one for [TDI] consisting of U1 and U2, and the one for [TDI2] containing U3.
- Because dynamic chains need independent JTAG signals, XJDeveloper needs to know the TAP groups that are being used, and therefore profiles can only be configured after the project's pin mapping has been defined.
Dynamic chains are set up in XJDeveloper's Pin Mapping screen, located within the list of screens under the Run and Deploy header:

Figure 4: Accessing the Pin Mapping Screen
To start, select the Advanced Configuration Options tab at the top of the screen as shown in Figure 5.
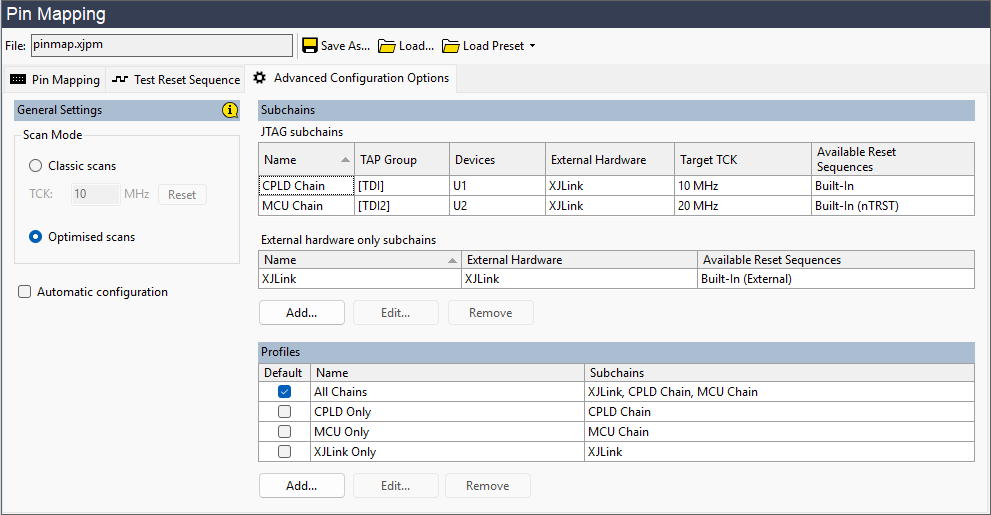
Figure 5: Dynamic Chains are configured under Advanced Configuration Options
The Advanced Configuration Options tab allows configuration of Dynamic Chains, and also some other settings which can have a significant effect on test behaviour and the time it takes to run tests.
General Settings
Under the General Settings heading you can configure:
- The Scan Mode for the project
- Automatic Configuration of dynamic chains
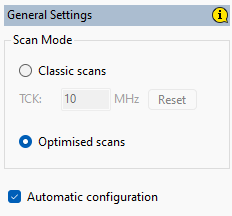
Figure 6: Scan Mode and Automatic Configuration Settings
Scan Mode
The Scan Mode radio button allows you to switch from the default (for new projects) of Optimised scans, to the Classic scans option that is also used by default in legacy projects.
When the Optimised scans feature is enabled:
- Subchains will run simultaneously, transferring data at different frequencies (but will synchronise certain operations to allow signals to be sent between them).
- XJTAG will automatically select the subchains from the currently selected profile that need to run for each test, and chains which have no data to send or read can be suspended.
- The default frequency for each chain will be that of the lowest-rated device in that chain (using data from the BSDL files).
When the Optimised scans feature is not enabled:
- XJTAG will send data through all JTAG chains, and will clock every chain at the same frequency, which is configured here.
- The default frequency will be the lowest rated frequency of any JTAG device in the circuit (taken from the BSDL files).
A Dynamic Chains setup is a requirement for the system to use Optimised scans, but Dynamic Chains can be useful whether or not Optimised scans are in use in a project, as will be seen later in this chapter.
Automatic Configuration
The Automatic configuration checkbox is enabled by default in new projects. When this is enabled, and both a Pin Mapping and JTAG chains are configured, XJTAG will automatically create a Dynamic Chains configuration. This will work for the majority of users where the chains are fully independent, but in cases where the Test Reset sequences are more complex or the startup of one JTAG chain depends on another, more configuration will be required.
The system will automatically create a JTAG subchain for each TAP Group, containing all of the possible JTAG devices for that group, plus all available external hardware. The subchain is given the name defined for its TAP group on the JTAG Chain screen.
In addition it will create an External hardware only Subchain with all of the available external hardware in it.
The system will also automatically create a profile called "All chains" which contains all of the subchains. The Test Reset order for this profile is the External hardware subchain, then the other subchains by increasing TAP group number.
On the Test Reset Sequences tab, sequences can be given a supported subchain. Therefore, subchains may have multiple compatible reset sequences available to them. The automatically generated profile will select sequences for each subchain as follows:
- If zero sequences are available, then the Built-In (nTRST) reset sequence is used unless the subchain has no nTRST pin configured for its TAP group, in which case the Built-In sequence is used.
- If one sequence is available, then that sequence is used.
- If more than one sequence is available, then the profile must be updated to specify which sequence should be applied.
- Automatically generated subchains and profiles may be edited, but this will result in them no longer being tracked, and will not be updated as parts of the project change.
Because the Optimised scans feature (see Figure 6) is enabled by default, the automatic configuration of dynamic chains means that projects will by default benefit from the system being able to automatically suspend activity on JTAG chains that are not required for a particular JTAG scan.
Manual Configuration of Dynamic Chains
You can edit an automatically-created dynamic chain configuration, or can create your own configuration, using the Subchains and Profiles tables on the right of the Advanced Configuration Options tab.
Prior to XJTAG 4.0 dynamic chain configuration functionality was provided via a button on the JTAG Chain screen.
These tables may be empty if the project was created prior to XJTAG 4.0 and does not use Dynamic Chains, otherwise it will show the current dynamic chains configuration. If the project was created in XJTAG 4.0 or later then by default there will be some automatically configured data (providing the JTAG chain and pin mapping have been set up). Editing automatically-generated configuration will remove the tick in the Auto column of the relevant table.
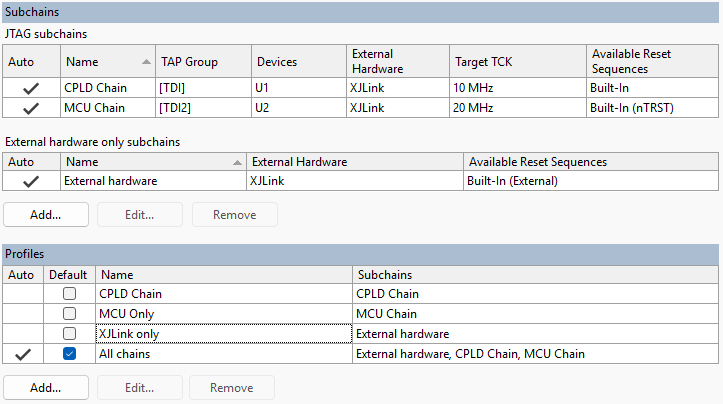
Figure 7: Configuring Subchains and Profiles
The Subchains table lists all the subchains in the project, while below that the Profiles table lists the profiles that have been set up. In this screenshot, several profiles have been created – one is the automatically generated All chains profile which accesses all devices simultaneously. The others are manually created profiles allowing access to each of the JTAG chains separately, or just the pins on the XJLink2 which are not acting as TAP pins.
Defining the subchains
The first step in creating or editing a dynamic chains setup is to make sure the correct subchains exist. A new subchain can be created by clicking Add... to open the Add Subchain dialog shown below, or you can select a subchain and click Edit... to open a similar dialog.
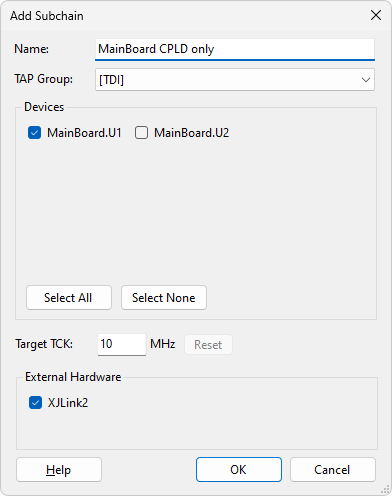
Figure 8: Adding a New Subchain
Provide a suitable name for the subchain (1) and select the required TAP group from the dropdown menu (2). Note that TAP groups are available in the menu if their pin allocations exist in the Pin Mapping tab of the screen. On selecting a TAP group, all the devices in that group will be listed and can be selected (3). Note that the "complete" JTAG chain with the maximum possible number of devices must already have been defined. Use the checkboxes to select or deselect devices until only the ones available in this subchain are selected.
- When you configure a subchain, you need to select all available devices unless you are using a JTAG multiplexer.
- The XJTAG system does not have visibility of how you are adding or removing devices from the chains. It therefore cannot prevent you from defining a subchain that it not possible to achieve. In the example of Figure 2, for instance, there is no way to have a subchain consisting only of U2, but XJDeveloper does not prevent you from defining such a subchain. It is therefore important to check you have not inadvertently defined a subchain that cannot be implemented.
The target TCK frequency for the subchain can be set here (4). It will default to the frequency of the slowest-rated device in the subchain. The frequency used when running tests may not be exactly this frequency but it will not exceed it.
External hardware that could be included in the subchain is also shown (5) and can be added or removed from this subchain using the checkboxes. Refer to Using External Hardware for more details.
The method for physically enabling the subchain is not configured in this dialog but is setup as part of configuring a Profile (see below).
- Each subchain that requires a custom Test Reset sequence must have its own defined, and cannot use one assigned to another subchain.
Once the information is correct, click OK to save this subchain. Repeat as necessary until all the subchains have been defined.
Configuring a Profile
Once all the subchains required for a particular profile have been defined, that profile can be set up. To create a new profile, click the Add... button in the Profiles section at the bottom of the Configure Profiles dialog to open the Add Profile dialog box, or select an existing one and click Edit...
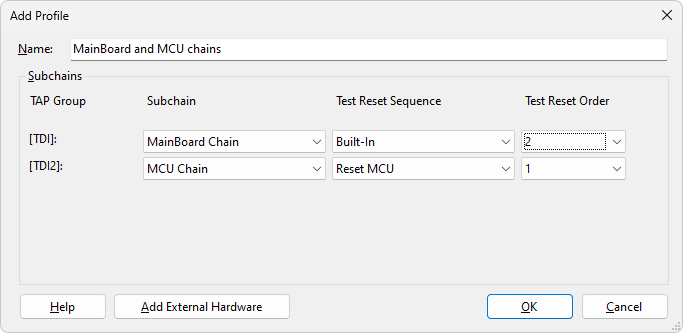
Figure 9: Defining a New Profile
Provide a descriptive name for the profile and then, for each TAP group, use the dropdown menu to select which subchain you want this profile to run. In the example of Figure 9 above, a profile is being created that accesses all the JTAG devices, so both TAP groups need to be used, and a subchain is therefore selected for each.
To create a profile where only the MCU is accessible, the MCU Chain subchain would have been selected for the [TDI2] TAP group, and the subchain choice for [TDI] would have been set to None.
If you've created a subchain that is solely external hardware, it can be added to the list by clicking the Add External Hardware button at the bottom of the dialog – see Adding External Hardware to a Profile below. This button will only appear if external hardware has already been defined.
This dialog is also where you tell XJTAG how to bring a subchain into a working state, by specifying which Test Reset Sequence the subchain should use (a subchain may have more than one test reset sequence associated with it, but each profile will need to use just one of them).
When a profile contains multiple subchains, the order in which they are to be started also needs to be defined, because one subchain may have to be functioning in order to enable others. Use the Test Reset Order dropdown menus to set the order accordingly (see Figure 9 above).
- You may need to add a delay between the different chains starting (e.g. if the first switches on power supplies, you may need to allow for settling time before starting a chain that relies on that supply being stable). In that case, add a delay in the Test Reset sequence as described in the section below on Test Reset Sequences for Subchains.
Once all the information has been added for the profile, click OK to save it. Repeat until all the required profiles have been configured.
Setting the Default Profile
A Default profile needs to be defined. This is the profile that will run by default during testing. XJDeveloper will automatically set the first profile that is defined as the default, but this can be changed by altering the tick in the boxes as shown below. Clicking OK without a default defined will cause an error message.

Figure 10: Defining the Default Profile
The profile used for specific test groups can be changed later in the test list, and it is normally best to set the default profile to the one containing all the JTAG devices and allow this to be used until the tests have been fully debugged. Once all the tests are running correctly, it is recommended that you go to the XJRunner Setup screen and explicitly select the profile for each test, rather than leaving tests to use what is set as the default. This will remove the risk of your tests being affected if someone changes the default profile, for example to select a particular subchain in Explorer.
- Explorer will only display information based on the default profile.
- Connection Test will not drive a net that includes a pin on a JTAG device from an inactive subchain, so running the test with some devices omitted can significantly reduce test coverage. It is therefore strongly recommended that Connection Test is run in a profile that gives the most active JTAG devices.
For details on how to change the profile used by a particular test group, refer to the later section on Using Dynamic Chains in XJRunner Tests.
- If a post function or a post-testing function is set, it should be noted that the post function will run in the same profile as the associated test, but the post-testing function will run in the default profile.
XJTAG v4.3.0