Finding Faults using XJEase Tests
To see how running tests against the non-JTAG devices in your circuit can find faults, change the test selection so that the SRAM test is run as well as the Connection Test:
- Double-click the SRAM Tests group name in the Test List to re-enable the SRAM test.
N.B. Changing the selected tests in the  Run Tests screen is different to selecting the default tests in the
  XJRunner Setup screen. Altering the selection of tests in the Run Tests screen is temporary: these selections will not be stored when XJDeveloper is closed, or exported as the set of Default Tests to XJRunner if an XJPack file is created. To make permanent changes you need to change which tests are selected in the XJRunner Setup screen.
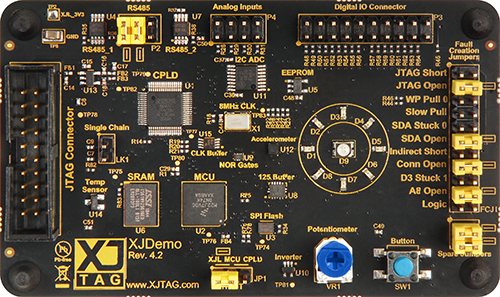
- Remove the jumper marked A8 Open on FCJ1 – see picture.
- Click
 Run to run the tests.
The SRAM tests will fail and you will see the following output:
CONNTEST passed - ran in default profile (All chains)
Testing SRAM U6...
Testing address and data bus...
ERROR: Optimised test failed. Running detailed diagnostic test...
ERROR: ADDRESS bus bit 8 (pin H2, net A8-A8a) failure
U6.Test failed (Error = 1) - ran in default profile (All chains)
>>>> FAILED <<<<
| NAME | RESULT | SUMMARY | TIME |
|---|---|---|---|
 Connection Test - using default profile Connection Test - using default profile |
Passed | 0.415 | |
| SRAM Tests - using default profile |
Failed | 0.058 | |
| TOTAL TIME | 0.473 |
The output shows that ADDRESS bus bit 8 has been correctly identified as the location of the fault. The test has not been able to explicitly say that it is an open circuit fault as there is no boundary scan on the SRAM to confirm that the values written from the MCU fail to arrive.
The other type of fault that could cause such a failure in the SRAM test would be if the net was shorted to power or ground. In this case, you can be confident that this is not the problem as the Connection Test ran and passed before the SRAM test was run.
- Re-fit the jumper marked A8 Open to FCJ1 to close the open circuit.
- Use one of the Spare Jumpers to create the fault marked as D3 Stuck 1 on FCJ1 – see picture.
- Click Run to run the tests again.
You have already seen that the Connection Test can find this error, and so both the Connection Test and the SRAM tests will fail and you will see the following output:
Error on net D3: Stuck at 1.
Net Detail
Error Detail
1 error
CONNTEST failed - ran in default profile (All chains)
Testing SRAM U6...
Testing address and data bus...
ERROR: Optimised test failed. Running detailed diagnostic test...
ERROR: DATA bus bit 3 (pin D5, net D3) is either open or shorted to power
U6.Test failed (Error = 1) - ran in default profile (All chains)
>>>> FAILED <<<<
| NAME | RESULT | SUMMARY | TIME |
|---|---|---|---|
| Connection Test - using default profile |
Failed | 0.424 | |
| SRAM Tests - using default profile |
Failed | 0.052 | |
| TOTAL TIME | 0.476 |
The output from the Connection Test shows D3 stuck at 1. The output from the SRAM test also highlights a problem with net D3. The SRAM test cannot give the definitive Stuck at 1 fault report. However, each time the net was read during the test, the value was high. As the error message says, there are two potential causes for this:
- The net could be shorted to power.
- There could be an open circuit fault at either the JTAG device or the SRAM. Because the net should be driven by the SRAM when it is read during this test, if it naturally floats high and there is an open circuit fault then the read value would always be high.
- Remove the jumper from FCJ1 to resolve the fault.
- Replace the jumper on the Spare Jumpers for future use.
In the next step of the tutorial, you will have a look at some of the XJEase code that is used to implement these tests.
XJTAG v4.3.0