Categorising Devices – Automatic Suggestions
You have seen that XJDeveloper was able to suggest the correct model to use when categorising the resistors in the previous step. The nature of these devices meant that the same model could be used for all the devices in each suggestion group. Because this project contains BOM information, XJDeveloper can not only make suggestions about which category devices should be put in, but in many cases it can also suggest which models from the installed libraries should be used to describe those devices.
- Select the Suggested Devices group from the Uncategorised Devices list.
- Click Suggest at the bottom of the Uncategorised Devices list and select Any.
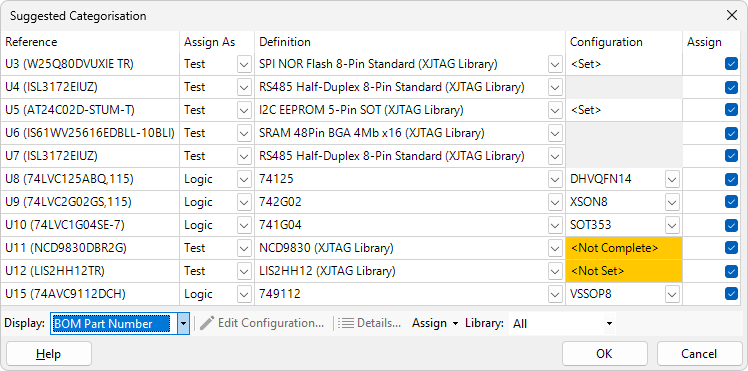
XJDeveloper will now display the Suggested Categorisation dialog.
- In the toolbar at the bottom of the dialog, select BOM Part Number from the Display dropdown menu.
The Suggested Categorisation dialog shows the following columns:
- Reference – lists the components that have been matched with a device model. If a model is not found for a component then the device will not be listed. Because you selected to display the BOM Part Number, each component also displays that information next to the reference (in parentheses).
- Assign As – displays the category the device will be put into. The dropdown list can also be used to mark the device as Ignored or Unfitted.
- Definition – displays the model that the device has matched. If the device matches multiple device models then Select will be displayed with the cell highlighted, and the dropdown list will allow you to select the correct match.
- Configuration – allows you to set device specific configuration options. In this case, XJDeveloper has preselected configuration options for most devices based on the information available from the BOM file. You will need to manually configure the options for U12.
- Assign – shows which devices are to be categorised when OK is clicked. If a definition has not been selected then the checkbox for that device will not be enabled.
If you need to override the configuration values that have been automatically set, you can click  Edit Configuration... to set them manually.
U12 can operate in SPI or I2C so you need to set the configuration values to let the system know which mode should be used.
- In the Suggested Categorisation dialog, right-click the row for device U12 and select
 Show in Schematic Viewer.
You can see that the board has been designed to use the I2C interface, so the configuration must be set to let XJDeveloper know this.
- Return to the Suggested Categorisation dialog.
- Double-click <Not Set> in the Configuration column for U12.
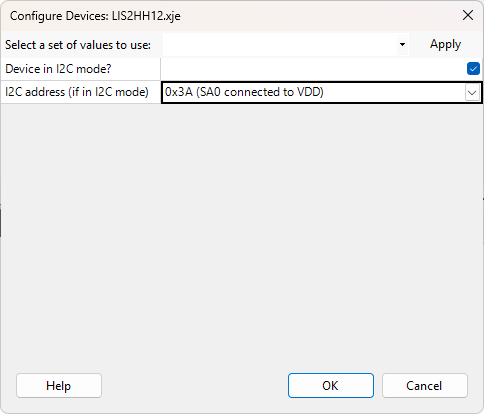
- In the Configure Device dialog, tick Device in I2C mode? to set I2C as the protocol to be used.
- On the XJDemo board the SA0 pin (U12.3) is connected to power, so select 0x3A (SA0 connected to VDD) from the I2C address (if in I2C mode) dropdown menu.
- Click OK to accept this configuration setting.
The device U11 is an I2C device with an address set by the values on the relevant pins. The configuration required for the XJDemo board has helpfully been written on the schematic.
- Right-click U11 in the Reference column of the dialog and select Show in Schematic Viewer.
- Underneath U11 in the schematic note that it shows "I2C Address 0x90" (you could also get this information from the datasheet and looking at pins 12 and 13 which are hard-wired to Ground).
- Return to the Suggested Categorisation dialog.
- Double-click the Configuration table cell for U11.
- In the Configure Device dialog use the I2C address - 8 bit (7 bit) dropdown menu to select the address of 0x90 (0x48).
- Click OK to accept this configuration setting.
With all of the configuration values now set you can make the assignments that have been suggested.
- Click OK in the Suggested Categorisation dialog to assign the devices as listed and return to the
 Categorise Devices screen.
 - Click Yes if you are asked whether you want to add tests to the XJRunner test list. XJDeveloper will then automatically add tests to the XJRunner Test List for the devices categorised as Test.
- Click
 Save on the main XJDeveloper toolbar.
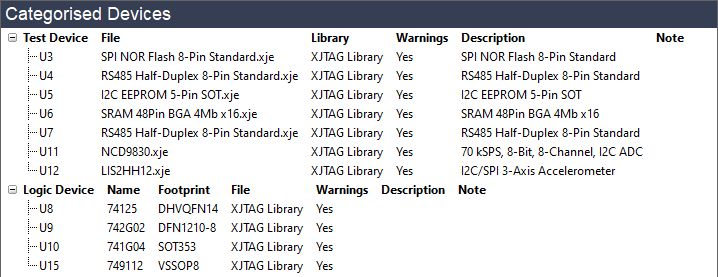
 - In the Categorised Devices panel, expand the Test Devices and Logic Devices lists and verify that they match what is shown below.
When you accept the device suggestions, XJTAG will make a copy of the models being used from the libraries and save them to files in your project directory. This will allow you to view and edit them if you wish, and means that if you transfer the project to another PC with a different version of the XJEase library, the project will work in exactly the same way.
There are several mechanisms for categorising devices – for more information, see the relevant page in the main XJDeveloper Help.
Additional Uncategorised Devices
Among the 21 devices which have still not been categorised is the resistor R40. This was not present in the list until now, but categorising the logic devices in the circuit has now given XJDeveloper knowledge of how to access this component. It is quite normal that categorising devices will sometimes result in more devices that need to be categorised.
The remaining devices will be categorised in the following steps of the tutorial. Although the assignment suggestions are very helpful, you will almost certainly be required to manually categorise at least some devices when you are setting up XJTAG projects, and so in order to demonstrate this process you will manually assign the rest of the accessible devices.
Reviewing Test Coverage
- Click
 Test Coverage under Setup.
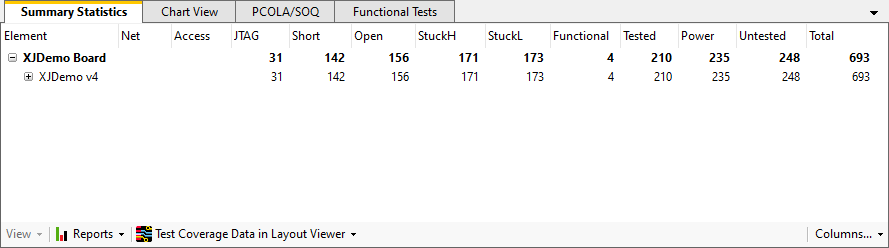
Not only has the number of pins being tested increased, but the total number of pins has actually decreased. This decrease is caused by the devices that have been categorised as Unfitted Devices. The increase in the number of Tested pins has come from two sources:
- The Connection Test can now include more nets as it now knows about all devices on those nets.
- The files used to categorise Test Devices contain information about the coverage that is added by running the tests they provide.
The number of Tested pins will increase further as the remaining devices are also categorised in the following section of the tutorial.
XJTAG v4.3.0